Hbase 介绍
Hbase的官方文档中有对Hbase的详细介绍,这里不再赘述。这里用一句话描述如下:
Apache HBase™ is the Hadoop database, a distributed, scalable, big data store.
Use Apache HBase™ when you need random, realtime read/write access to your Big Data. This project’s goal is the hosting of very large tables – billions of rows X millions of columns – atop clusters of commodity hardware. Apache HBase is an open-source, distributed, versioned, non-relational database modeled after Google’s Bigtable: A Distributed Storage System for Structured Data by Chang et al. Just as Bigtable leverages the distributed data storage provided by the Google File System, Apache HBase provides Bigtable-like capabilities on top of Hadoop and HDFS.
Hbase 的安装
安装过程参考这里:
http://hbase.apache.org/book.html#quickstart_fully_distributed
Hbase依赖于HADOOP,我们在上一篇hadoop 集群的搭建HA的基础上安装Hbase。
节点分布如下:
master:
    ip: 192.168.56.110
    hostname: hadoop-host-master
slave1:
    ip: 192.168.56.111
    hostname: hadoop-host-slave-1
slave2:
    ip: 192.168.56.112
    hostname: hadoop-host-slave-2
slave3:
    ip: 192.168.56.113
    hostname: hadoop-host-slave-3
如下图(绿色代表在这些节点上面安装这些程序,与hadoop 集群的搭建HA安装中的图类似,这里多了后面两列):

安装NTP
可能还要在各节点服务器上面安装NTP服务,实现服务器节点间时间的一致。如果服务器节点间的时间不一致,可能会引发HBase的异常,这一点在HBase官网上有特别强调。在这里,设置我的笔记本电脑为NTP的服务端节点,即是我的电脑从国家授时中心同步时间,然后其它节点(master、slave1、slave2、slave3)作为客户端从我的笔记本同步时间。此篇的安装过程将省略这个步骤,在后续篇章中再介绍,本篇将手动将各节点的时间调成一致。
修改ulimit
Configuring the maximum number of file descriptors and processes for the user who is running the HBase process is an operating system configuration, rather than an HBase configuration. It is also important to be sure that the settings are changed for the user that actually runs HBase. To see which user started HBase, and that user’s ulimit configuration, look at the first line of the HBase log for that instance.
修改ulimit,以增加linux系统能同时打开文件的数量
1 | $ vi /etc/security/limits.conf |
修改后需重启系统才能生效。
下载Hbase
首先下载Hbase,我们下载的时候,要选择适合我们HADOOP版本的Hbase,我们下载的稳定版为hbase-1.2.6-bin.tar.gz,将压缩包首先传到master节点的/home/hadoop/目录下,先在master节点配置好,然后同步到其他3个节点。1
2
3
4
5
6$ cd /home/hadoop/
$ tar xzvf hbase-1.2.6-bin.tar.gz
$
$ cd hbase-1.2.6/
$ ls
bin CHANGES.txt conf docs hbase-webapps LEGAL lib LICENSE.txt NOTICE.txt README.txt
配置hbase-env.sh,加上JDK绝对路径
- JDK的路径就是安装JDK的时候的路径;
- Hbase内置有zookeeper,但是为了方便管理,我们单独部署zookeeper,即使用HADOOP中用作ZKFC的zookeeper;
1 | $ cd /home/hadoop/hbase-1.2.6/conf |
配置hbase-site.xml
1 | $ cd /home/hadoop/hbase-1.2.6/conf |
配置regionservers
在将要运行regionservers的节点加入此文件中1
2
3
4
5
6$ cd /home/hadoop/hbase-1.2.6/conf
$ vi regionservers
hadoop-host-slave-1
hadoop-host-slave-2
hadoop-host-slave-3
配置backup-masters
我们将hadoop-host-master作为Hbase集群的master,并配置HBase使用hadoop-host-slave-1作为backup master,在conf目录下创建一个文件backup-masters, 并在其中添加作为backup master的主机名1
2
3
4$ cd /home/hadoop/hbase-1.2.6/conf
$ vi backup-masters
hadoop-host-slave-1
复制hdfs-site.xml配置文件
复制$HADOOP_HOME/etc/hadoop/hdfs-site.xml到$HBASE_HOME/conf目录下,这样以保证HDFS与Hbase两边配置一致,这也是官网所推荐的方式。例子,如果HDFS中配置的副本数量为5(默认为3),如果没有将hadoop的hdfs-site.xml复制到$HBASE_HOME/conf目录下,则Hbase将会按3份备份,从而两边不一致,导致出现异常。
1 | $ cd /home/hadoop/hbase-1.2.6/conf/ |
至此,配置完毕,将这些配置同步到其他三个节点,在hadoop-host-master上面执行:1
2
3
4$ cd /home/hadoop/
$ scp -r hbase-1.2.6 hadoop@hadoop-host-slave-1:/home/hadoop/
$ scp -r hbase-1.2.6 hadoop@hadoop-host-slave-2:/home/hadoop/
$ scp -r hbase-1.2.6 hadoop@hadoop-host-slave-3:/home/hadoop/
启动Hbase
可使用$HBASE_HOME/bin/start-hbase.sh指令启动整个集群,如果要使用该命令,则集群的节点间必须实现ssh的免密码登录,这样才能到不同的节点启动服务。
按我们前面的规划,hadoop-host-master将作为Hbase集群的master,其实在哪台机器上面运行start-hbase.sh指令,那么这台机器将成为master。1
2$ cd /home/hadoop/hbase-1.2.6/bin
$ ./start-hbase.sh
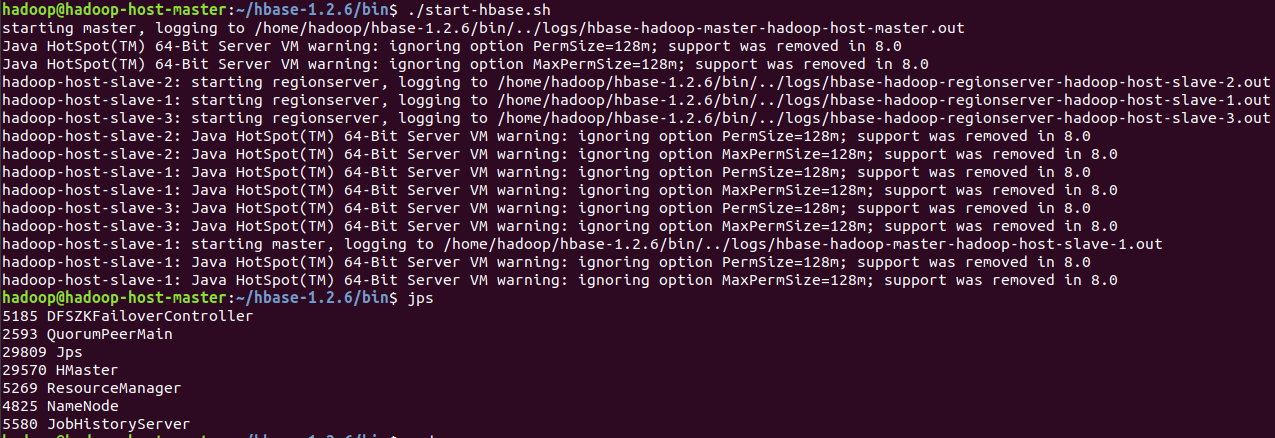
当执行jps指令后,可以看到hadoop-host-master上面多了一个HMaster进程,在hadoop-host-slave-1中会同时存在HMaster、HRegionServer进程,而在其他两个节点则只存在HRegionServer进程。
另外,我们可以在其他任何机器通过以下命令启动一个master1
2
3
4
5$ cd /home/hadoop/hbase-1.2.6/bin
$ ./hbase-daemon.sh start master
或者启动作为backup master
$ ./hbase-daemon.sh start master --backup
可以在实体机的浏览器中输入:
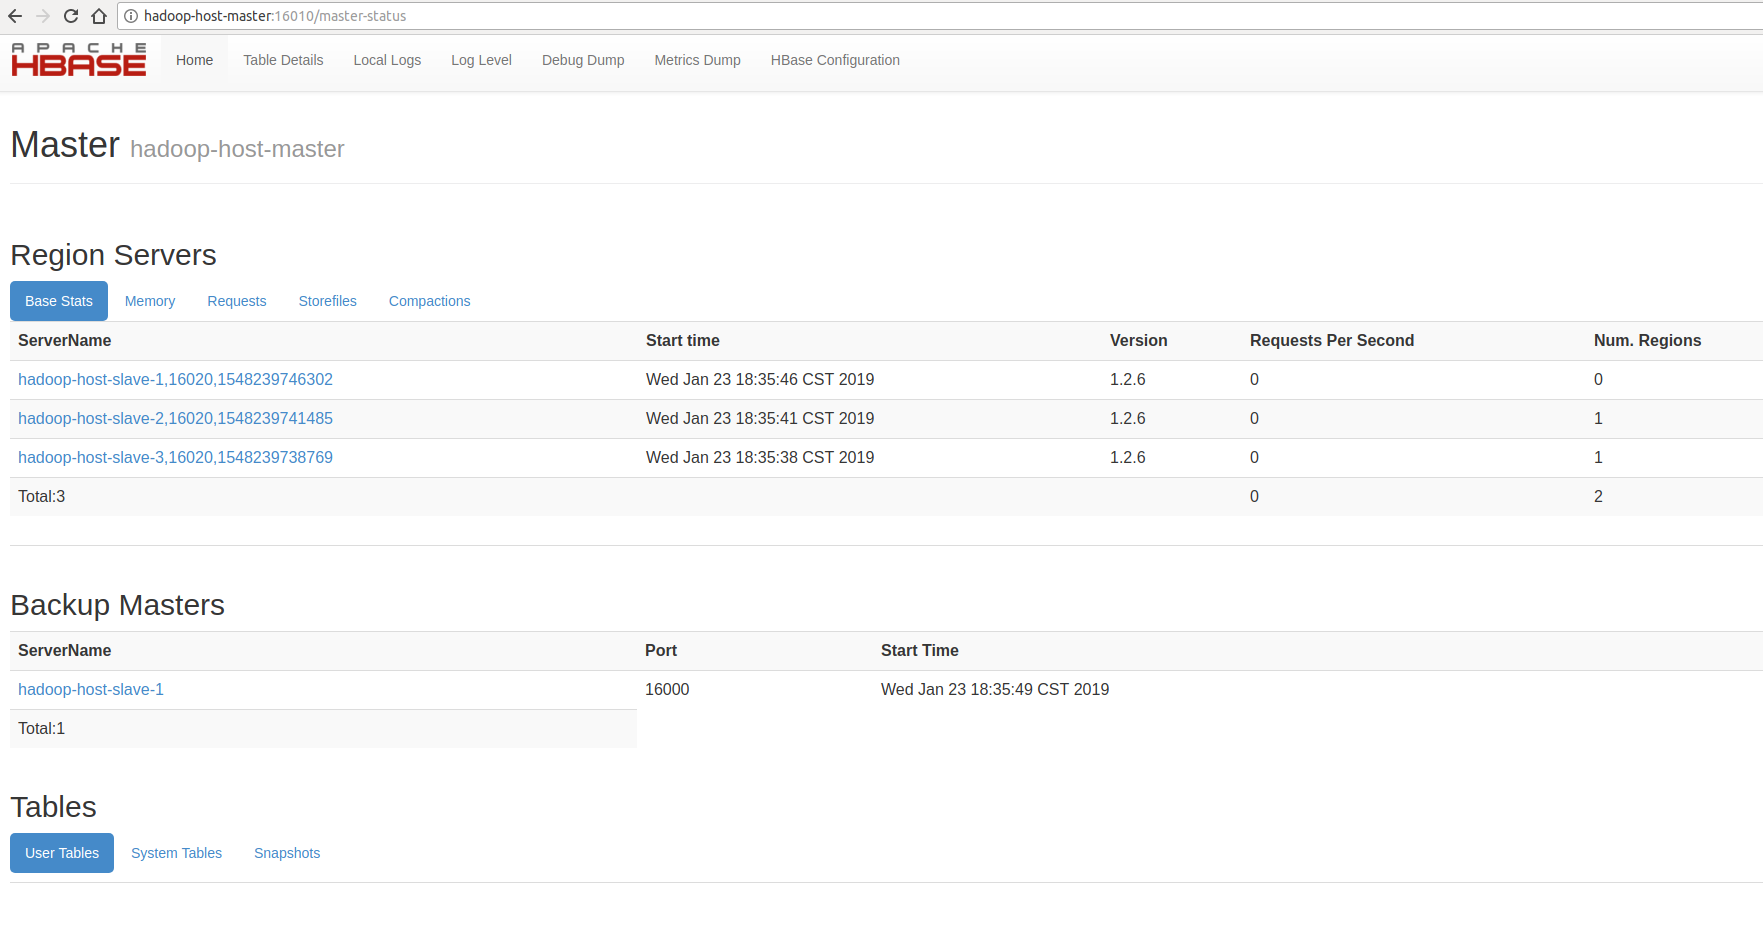
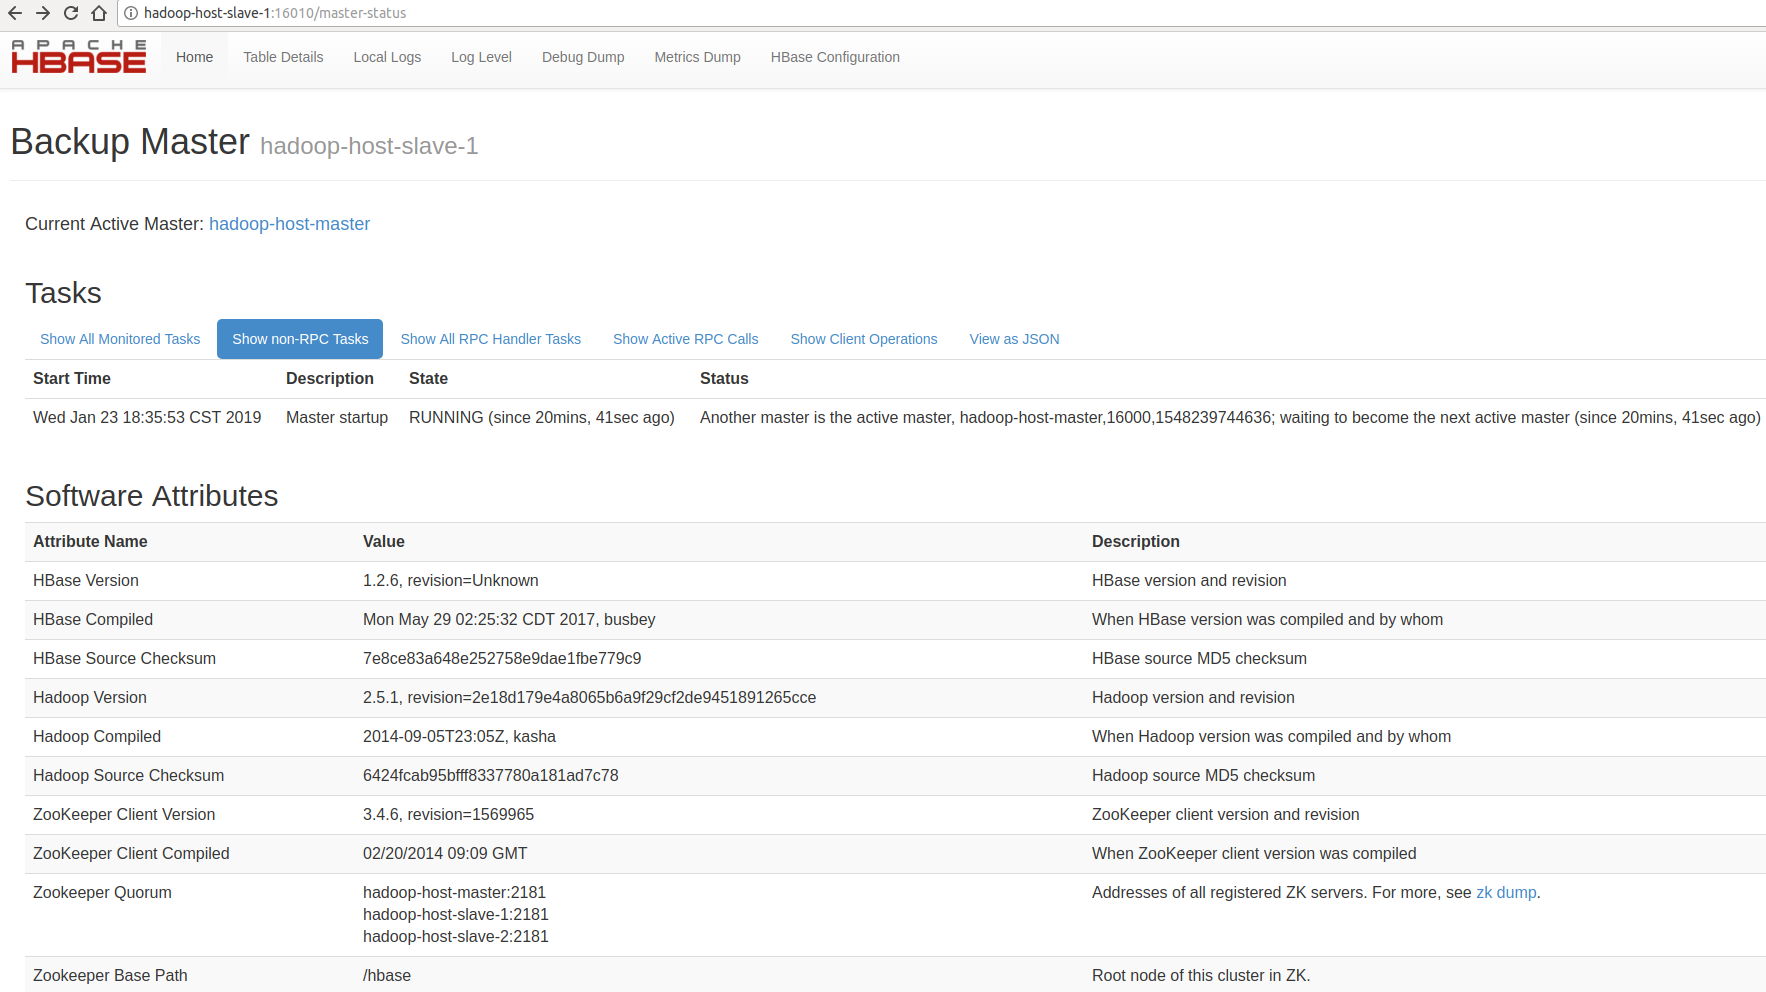
http://hadoop-host-master:16010/
http://hadoop-host-slave-1:16010/
来查看是否启动成功,如无意外的话,你会看到如下结果页面。其中一个是Master,另一个是Back Master:
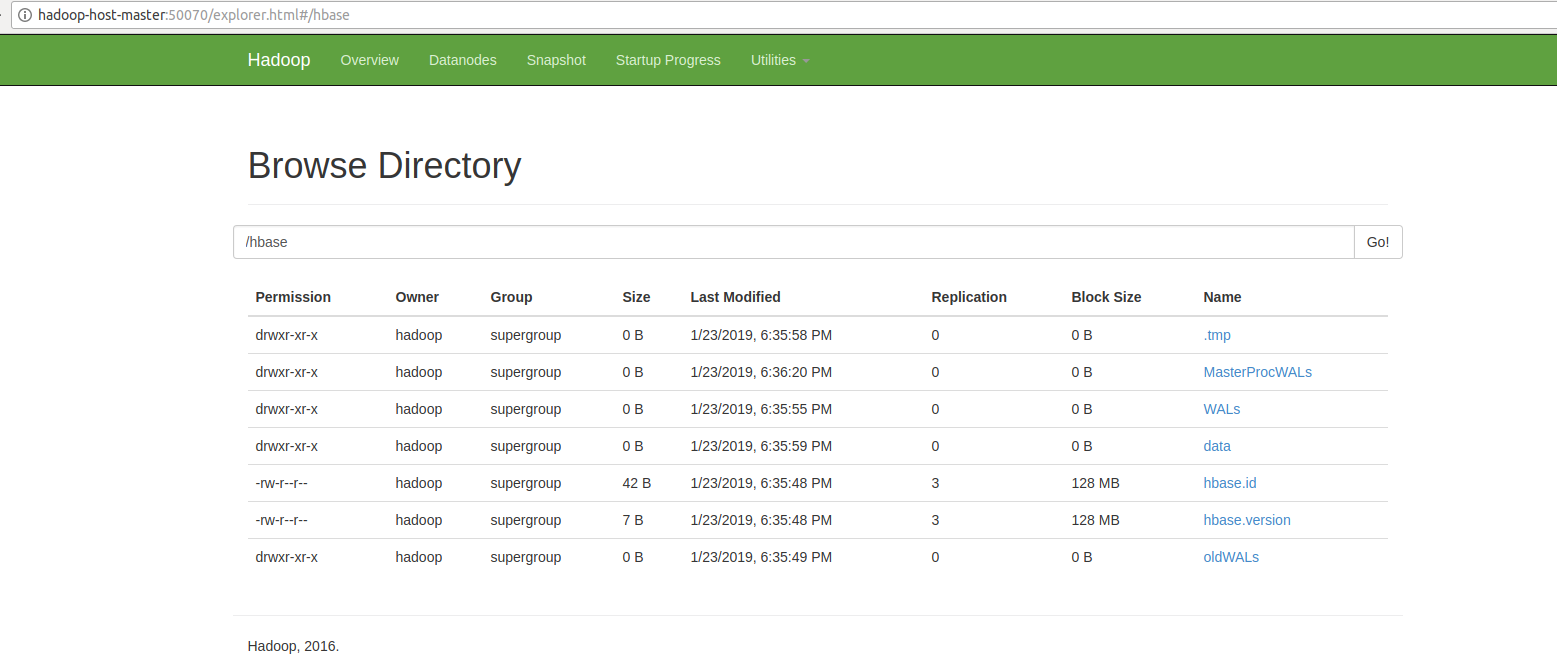
同样的它在HDFS中也自动创建了保存数据的目录:
至此,集群搭建成功。
Hbase初体验
首先我们通过SHELL的方式简单体验一下Hbase:1
2
3
4
5
6
7
8
9
10
11
12$ cd /home/hadoop/hbase-1.2.6/
$ ./bin/hbase shell
2019-01-23 19:16:36,118 WARN [main] util.NativeCodeLoader: Unable to load native-hadoop library for your platform... using builtin-java classes where applicable
HBase Shell; enter 'help<RETURN>' for list of supported commands.
Type "exit<RETURN>" to leave the HBase Shell
Version 1.2.6, rUnknown, Mon May 29 02:25:32 CDT 2017
hbase(main):001:0> list
TABLE
0 row(s) in 0.6030 seconds
=> []
由上述结果可知,Hbase中现在没有一张表。我们尝试创建一张表t_student:1
2
3
4
5
6
7
8
9
10
11
12
13
14
15
16
17hbase(main):002:0> create 't_student', 'cf1'
0 row(s) in 2.4700 seconds
=> Hbase::Table - t_student
hbase(main):003:0> list
TABLE
t_student
1 row(s) in 0.0250 seconds
=> ["t_student"]
hbase(main):004:0> desc 't_student'
Table t_student is ENABLED
t_student
COLUMN FAMILIES DESCRIPTION
{NAME => 'cf1', BLOOMFILTER => 'ROW', VERSIONS => '1', IN_MEMORY => 'false', KEEP_DELETED_CELLS => 'FALSE', DATA_BLOCK_ENCODING => 'NONE', TTL => 'FOREVER', COMPRESSION => 'NONE', MIN_VERSIONS => '0', BLO
CKCACHE => 'true', BLOCKSIZE => '65536', REPLICATION_SCOPE => '0'}
1 row(s) in 0.2010 seconds
往表中插入2条数据:1
2
3
4
5
6
7
8
9
10
11hbase(main):005:0> put 't_student', '01', 'cf1:name', 'tim'
0 row(s) in 0.1840 seconds
hbase(main):006:0> put 't_student', '02', 'cf1:name', 'timho'
0 row(s) in 0.3630 seconds
hbase(main):007:0> scan 't_student'
ROW COLUMN+CELL
01 column=cf1:name, timestamp=1548242390794, value=tim
02 column=cf1:name, timestamp=1548246522887, value=timho
2 row(s) in 0.1240 seconds
插入数据之后,可能在HDFS中还不能立刻看到,因为数据还在内存中,但可以通过以下命令将数据立刻写到HDFS中:1
2hbase(main):008:0> flush 't_student'
0 row(s) in 0.7290 seconds
然后我们可以在HDFS、Hbase的管理界面分别看到表信息:


当我们在HDFS中看到表中的某个块的数据,如下:
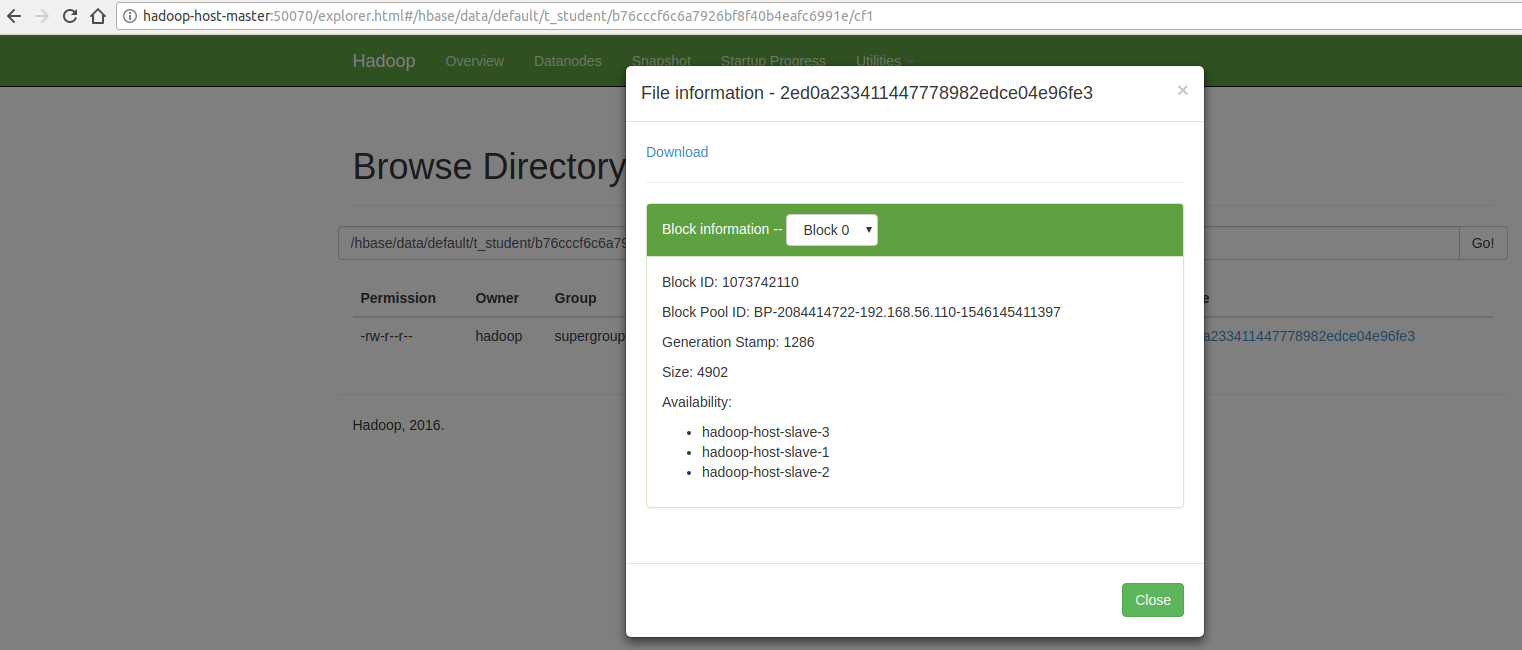
我们可以通过Hbase中的命令来查看数据的真实内容:1
2
3
4
5
6$ cd /home/hadoop/hbase-1.2.6
$ ./bin/hbase hfile -p -f /hbase/data/default/t_student/b76cccf6c6a7926bf8f40b4eafc6991e/cf1/2ed0a233411447778982edce04e96fe3
2019-01-23 19:45:33,200 WARN [main] util.NativeCodeLoader: Unable to load native-hadoop library for your platform... using builtin-java classes where applicable
2019-01-23 19:45:34,046 INFO [main] hfile.CacheConfig: Created cacheConfig: CacheConfig:disabled
K: 01/cf1:name/1548242390794/Put/vlen=3/seqid=4 V: tim
Scanned kv count -> 1
查看集群状态和节点数量1
2hbase(main):009:0> status
1 active master, 1 backup masters, 3 servers, 0 dead, 1.0000 average load
根据条件查询数据1
2
3
4hbase(main):010:0> get 't_student', '01'
COLUMN CELL
cf1:name timestamp=1548242390794, value=tim
1 row(s) in 0.0590 seconds
表失效、表生效、删除表:
- 使用
disable命令可将某张表失效,失效后该表将不能使用; - 使用
enable命令可使表重新生效,表生效后,即可对表进行操作; - 使用
drop命令可对表进行删除,但只有表在失效的情况下,才能进行删除。
1 | hbase(main):011:0> desc 't_student' |
退出 hbase shell1
hbase(main):018:0> quit
遇到的问题
有时候我们重启了hadoop集群后,发现hbase无法使用,有可能是我们在hbase-site.xml中配置的hadoop master节点已经不是active了,解决办法是在hadoop中手动将其设为active状态;
主从节点时间没有同步时,极有可能出现如下错误,同步时间后可以正常启动:
master.ServerManager: Waiting for region servers count to settle; currently checked in 0, slept for 855041 ms, expecting minimum of 1, maximum of 2147483647, timeout of 4500 ms, interval of 1500 ms.

[HBase] ERROR:org.apache.hadoop.hbase.PleaseHoldException: Master is initializing
java操作Hbase
java操作Hbase的例子见这里:HbaseUtil.java、HbaseDemo.java
未完,待续……