下面说说elasticsearch集群的搭建,同样是使用前面例子elasticsearch 单节点安装使用的elasticsearch-6.4.0.tar.gz版本,我在一台机器上安装,所以这是伪集群,当修改为真集群的时候,只要将IP地址修改下即可,下面会说明。
下面开始搭建elasticsearch集群
创建一个目录用于存放集群使用到的所有实例信息1
2$ cd /home/hewentian/ProjectD
$ mkdir elasticsearchCluster # 集群的文件都放在这里
将一个elasticsearch压缩包放到这个目录,我之前已在ProjectD目录下载好了1
2
3
4
5
6
7$ cd /home/hewentian/ProjectD/elasticsearchCluster
$ cp /home/hewentian/ProjectD/elasticsearch-6.4.0.tar.gz ./
$ tar xzvf elasticsearch-6.4.0.tar.gz
为方便起见,这里将其重命名为elasticsearch-node1,先将elasticsearch-node1配置好,
后面会将其复制为elasticsearch-node2, elasticsearch-node3
$ mv elasticsearch-6.4.0 elasticsearch-node1
对elasticsearch-node1进行设置:1
2
3
4
5
6
7
8
9
10
11
12
13
14
15
16
17
18
19
20
21
22$ cd /home/hewentian/ProjectD/elasticsearchCluster/elasticsearch-node1/config
$ vi elasticsearch.yml # 增加下面的配置
cluster.name: hewentian-cluster # 配置集群的名字
node.name: node-1 # 配置集群下的节点的名字
node.master: true # 是否有资格被选举为master节点, 默认为 true
node.data: true # 设置该节点是否存储数据, 默认为 true
network.host: 127.0.0.1 # 设置本机IP地址
http.port: 9201 # 将端口设置成9201
transport.tcp.port: 9301 # 内部节点之间沟通的端口
discovery.zen.ping.unicast.hosts: ["127.0.0.1:9301", "127.0.0.1:9302", "127.0.0.1:9303"]
discovery.zen.minimum_master_nodes: 2 # total number of master-eligible nodes / 2 + 1
action.destructive_requires_name: true
允许跨域,否则 elasticsearch head 不能访问 elasticsearch
http.cors.enabled: true
http.cors.allow-origin: "*"
这样一个节点就配置好了,我们只要以这个为蓝本,复制出两份,并修改其中的三点:node.name、http.port、transport.tcp.port即可。1
2
3
4
5
6
7
8
9
10
11
12
13
14
15
16
17
18
19
20
21$ cd /home/hewentian/ProjectD/elasticsearchCluster
$ cp -r elasticsearch-node1 elasticsearch-node2
$ cp -r elasticsearch-node1 elasticsearch-node3
$ ls
elasticsearch-6.4.0.tar.gz elasticsearch-node1 elasticsearch-node2 elasticsearch-node3
对 elasticsearch-node2 进行设置,只修改如下三项
$ vi /home/hewentian/ProjectD/elasticsearchCluster/elasticsearch-node2/config/elasticsearch.yml
node.name: node-2
http.port: 9202
transport.tcp.port: 9302
对 elasticsearch-node3 进行设置,只修改如下三项
$ vi /home/hewentian/ProjectD/elasticsearchCluster/elasticsearch-node3/config/elasticsearch.yml
node.name: node-3
http.port: 9203
transport.tcp.port: 9303
内存大小的设置,根据机器内存大小而设置,一般不超过系统总内存的一半,分别对三个节点进行:1
2
3
4
5$ cd /home/hewentian/ProjectD/elasticsearchCluster/elasticsearch-node1/config/
$ vi jvm.options
-Xms1g
-Xmx1g
在每个节点所在的机器上都作下面的配置(下面是根据我机器的情况作的配置,我的是伪集群,所以只配置一次):1
2
3
4
5
6
7
8
9
10
11
12
13
14
15$ su root # 必须在 root 下才有权限修改系统配置文件
Password:
$ vi /etc/security/limits.conf # 添加如下配置
* soft nofile 65536 # 上面第一个错误有提示
* hard nofile 131072 # 一般为 soft nofile 的2倍
* soft nproc 4096 # 这个设置线程数
* hard nproc 8192
$ vi /etc/sysctl.conf # 添加如下配置
vm.max_map_count=262144
$ sysctl -p # 最后执行这个命令,你会见到如下输出
vm.max_map_count=262144
$ exit # 退出 root
分别启动三个节点:1
2
3
4
5
6
7
8$ cd /home/hewentian/ProjectD/elasticsearchCluster/elasticsearch-node1/bin
$ ./elasticsearch
$ cd /home/hewentian/ProjectD/elasticsearchCluster/elasticsearch-node2/bin
$ ./elasticsearch
$ cd /home/hewentian/ProjectD/elasticsearchCluster/elasticsearch-node3/bin
$ ./elasticsearch
部分输出如下:
[2018-09-17T17:27:08,325][INFO ][o.e.n.Node               ] [node-1] initializing ...
[2018-09-17T17:27:08,430][INFO ][o.e.e.NodeEnvironment    ] [node-1] using [1] data paths, mounts [[/ (/dev/sda2)]], net usable_space [59.7gb], net total_space [101.7gb], types [ext4]

[2018-09-17T17:27:19,552][DEBUG][o.e.a.ActionModule       ] Using REST wrapper from plugin org.elasticsearch.xpack.security.Security
[2018-09-17T17:27:19,878][INFO ][o.e.d.DiscoveryModule    ] [node-1] using discovery type [zen]
[2018-09-17T17:27:21,289][INFO ][o.e.n.Node               ] [node-1] initialized
[2018-09-17T17:27:21,289][INFO ][o.e.n.Node               ] [node-1] starting ...
[2018-09-17T17:27:21,496][INFO ][o.e.t.TransportService   ] [node-1] publish_address {127.0.0.1:9301}, bound_addresses {127.0.0.1:9301}
[2018-09-17T17:27:24,571][WARN ][o.e.d.z.ZenDiscovery     ] [node-1] not enough master nodes discovered during pinging (found [[Candidate{node={node-1}{D7fISYxgQFahYdTEbqMO4g}{7x0Hu4tQTP-N73j_A073DA}{127.0.0.1}{127.0.0.1:9301}{ml.machine_memory=8305086464, xpack.installed=true, ml.max_open_jobs=20, ml.enabled=true}, clusterStateVersion=-1}]], but needed [2]), pinging again

发现节点 node-2
[2018-09-17T17:28:37,362][INFO ][o.e.c.s.MasterService    ] [node-1] zen-disco-elected-as-master ([1] nodes joined)[, ], reason: new_master {node-1}{D7fISYxgQFahYdTEbqMO4g}{7x0Hu4tQTP-N73j_A073DA}{127.0.0.1}{127.0.0.1:9301}{ml.machine_memory=8305086464, xpack.installed=true, ml.max_open_jobs=20, ml.enabled=true}, added {{node-2}{LNHhP-WPSDaGZJeRHYwBQQ}{zRaTzS0OQkyfCdaRhczR9A}{127.0.0.1}{127.0.0.1:9302}{ml.machine_memory=8305086464, ml.max_open_jobs=20, xpack.installed=true, ml.enabled=true},}

发现节点 node-3
[node-1] zen-disco-node-join, reason: added {{node-3}{4rqo1NL0R8KVCAkzI0w4UQ}{s599uwThRGi74YE4WFULIg}{127.0.0.1}{127.0.0.1:9303}{ml.machine_memory=8305086464, ml.max_open_jobs=20, xpack.installed=true, ml.enabled=true},}
[2018-09-17T17:29:27,022][INFO ][o.e.c.s.ClusterApplierService] [node-1] added {{node-3}{4rqo1NL0R8KVCAkzI0w4UQ}{s599uwThRGi74YE4WFULIg}{127.0.0.1}{127.0.0.1:9303}{ml.machine_memory=8305086464, ml.max_open_jobs=20, xpack.installed=true, ml.enabled=true},}, reason: apply cluster state (from master [master {node-1}{D7fISYxgQFahYdTEbqMO4g}{7x0Hu4tQTP-N73j_A073DA}{127.0.0.1}{127.0.0.1:9301}{ml.machine_memory=8305086464, xpack.installed=true, ml.max_open_jobs=20, ml.enabled=true} committed version [15] source [zen-disco-node-join]])
在浏览器中输入如下地址:
http://localhost:9201/
http://localhost:9202/
http://localhost:9203/
{
  "name" : "node-1",
  "cluster_name" : "hewentian-cluster",
  "cluster_uuid" : "odUSNw8jS4q-w_Vl66q1qg",
  "version" : {
    "number" : "6.4.0",
    "build_flavor" : "default",
    "build_type" : "tar",
    "build_hash" : "595516e",
    "build_date" : "2018-08-17T23:18:47.308994Z",
    "build_snapshot" : false,
    "lucene_version" : "7.4.0",
    "minimum_wire_compatibility_version" : "5.6.0",
    "minimum_index_compatibility_version" : "5.0.0"
  },
  "tagline" : "You Know, for Search"
}

{
  "name" : "node-2",
  "cluster_name" : "hewentian-cluster",
  "cluster_uuid" : "odUSNw8jS4q-w_Vl66q1qg",
  "version" : {
    "number" : "6.4.0",
    "build_flavor" : "default",
    "build_type" : "tar",
    "build_hash" : "595516e",
    "build_date" : "2018-08-17T23:18:47.308994Z",
    "build_snapshot" : false,
    "lucene_version" : "7.4.0",
    "minimum_wire_compatibility_version" : "5.6.0",
    "minimum_index_compatibility_version" : "5.0.0"
  },
  "tagline" : "You Know, for Search"
}

{
  "name" : "node-3",
  "cluster_name" : "hewentian-cluster",
  "cluster_uuid" : "odUSNw8jS4q-w_Vl66q1qg",
  "version" : {
    "number" : "6.4.0",
    "build_flavor" : "default",
    "build_type" : "tar",
    "build_hash" : "595516e",
    "build_date" : "2018-08-17T23:18:47.308994Z",
    "build_snapshot" : false,
    "lucene_version" : "7.4.0",
    "minimum_wire_compatibility_version" : "5.6.0",
    "minimum_index_compatibility_version" : "5.0.0"
  },
  "tagline" : "You Know, for Search"
}
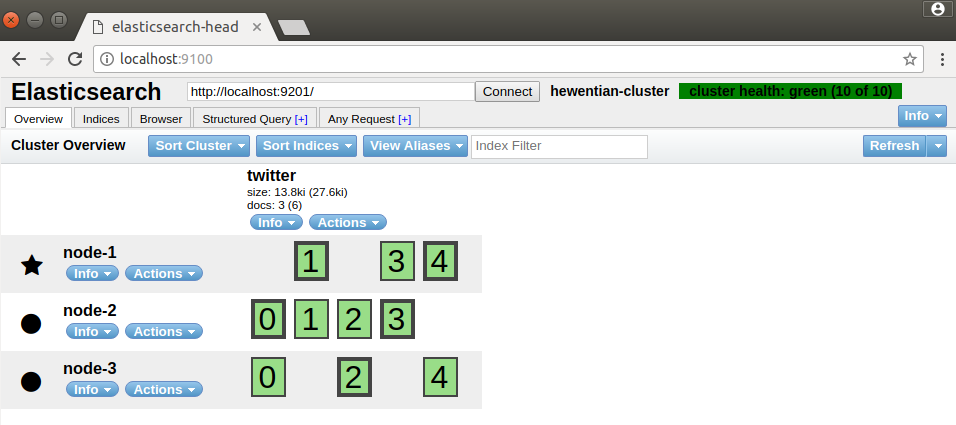
启动elasticsearch-head,我们就可以看到集群如下图所示:
从图中可以看到node-1已经成为master节点。我们尝试往集群中PUT一些数据,分别往3个不同的端口中PUT数据:
curl -XPUT 'http://localhost:9201/twitter/doc/1?pretty' -H 'Content-Type: application/json' -d '
{
    "user": "kimchy",
    "post_date": "2009-11-15T13:12:00",
    "message": "Trying out Elasticsearch, so far so good?"
}'

curl -XPUT 'http://localhost:9202/twitter/doc/2?pretty' -H 'Content-Type: application/json' -d '
{
    "user": "kimchy",
    "post_date": "2009-11-15T14:12:12",
    "message": "Another tweet, will it be indexed?"
}'

curl -XPUT 'http://localhost:9203/twitter/doc/3?pretty' -H 'Content-Type: application/json' -d '
{
    "user": "elastic",
    "post_date": "2010-01-15T01:46:38",
    "message": "Building the site, should be kewl"
}'
输出结果如下:
{
  "_index" : "twitter",
  "_type" : "doc",
  "_id" : "1",
  "_version" : 1,
  "result" : "created",
  "_shards" : {
    "total" : 2,
    "successful" : 2,
    "failed" : 0
  },
  "_seq_no" : 0,
  "_primary_term" : 1
}

{
  "_index" : "twitter",
  "_type" : "doc",
  "_id" : "2",
  "_version" : 1,
  "result" : "created",
  "_shards" : {
    "total" : 2,
    "successful" : 2,
    "failed" : 0
  },
  "_seq_no" : 0,
  "_primary_term" : 1
}

{
  "_index" : "twitter",
  "_type" : "doc",
  "_id" : "3",
  "_version" : 1,
  "result" : "created",
  "_shards" : {
    "total" : 2,
    "successful" : 2,
    "failed" : 0
  },
  "_seq_no" : 0,
  "_primary_term" : 1
}
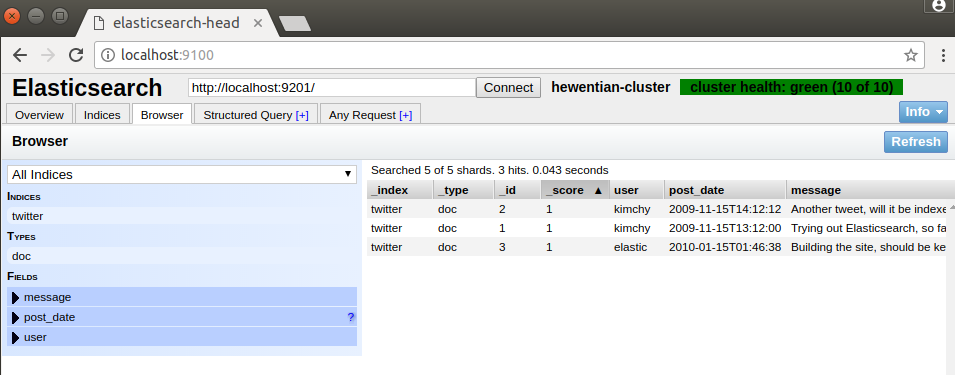
我们在elasticsearch-head中查看数据
elasticsearch-集群状态:
elasticsearch-集群数据
至此,集群搭建结束。