今天开始学习一下docker,因为它越来越流行了。首先,我们来安装一下。因为我的系统为Ubuntu Linux,所以我的安装过程,参照这里:
https://docs.docker.com/install/linux/docker-ce/ubuntu/
安装过程如下,在系统上首次安装的时候需要执行安装前的准备工作:
安装前的准备工作
第一步:首先卸载系统自带的旧版docker(如系统有预安装docker)1
$ sudo apt-get remove docker docker-engine docker.io containerd runc
第二步:更新apt包索引:1
$ sudo apt-get update
第三步:安装允许apt通过HTTPS访问仓库的软件包:1
2
3
4
5
6$ sudo apt-get install \
apt-transport-https \
ca-certificates \
curl \
gnupg-agent \
software-properties-common
第四步: 添加docker官方的GPG key:1
$ curl -fsSL https://download.docker.com/linux/ubuntu/gpg | sudo apt-key add -
验证添加KEY的指纹是否是9DC8 5822 9FC7 DD38 854A E2D8 8D81 803C 0EBF CD88,我们只需搜索最后8个字符即可:1
2
3
4
5$ sudo apt-key fingerprint 0EBFCD88
pub rsa4096 2017-02-22 [SCEA]
9DC8 5822 9FC7 DD38 854A E2D8 8D81 803C 0EBF CD88
uid [ unknown] Docker Release (CE deb) <docker@docker.com>
sub rsa4096 2017-02-22 [S]
第五步:将docker的下载路径添加到下载源中:1
2
3
4$ sudo add-apt-repository \
"deb [arch=amd64] https://download.docker.com/linux/ubuntu \
$(lsb_release -cs) \
stable"
开始正式安装
第一步:更新apt包索引:1
$ sudo apt-get update
第二步:开始安装docker最新的社区版:1
$ sudo apt-get install docker-ce docker-ce-cli containerd.io
安装结束后,docker的daemon进程默认自动启动,否则需要手动启动。1
$ sudo service docker start
可选命令有:
service docker {start|stop|restart|status}
第三步:验证安装是否正确无误,通过运行一个测试用例:1
2
3
4
5
6
7
8
9
10
11
12
13
14
15
16
17
18
19
20
21
22
23
24
25
26
27
28$ sudo docker run hello-world
Unable to find image 'hello-world:latest' locally
latest: Pulling from library/hello-world
1b930d010525: Pull complete
Digest: sha256:6540fc08ee6e6b7b63468dc3317e3303aae178cb8a45ed3123180328bcc1d20f
Status: Downloaded newer image for hello-world:latest
Hello from Docker!
This message shows that your installation appears to be working correctly.
To generate this message, Docker took the following steps:
1. The Docker client contacted the Docker daemon.
2. The Docker daemon pulled the "hello-world" image from the Docker Hub.
(amd64)
3. The Docker daemon created a new container from that image which runs the
executable that produces the output you are currently reading.
4. The Docker daemon streamed that output to the Docker client, which sent it
to your terminal.
To try something more ambitious, you can run an Ubuntu container with:
$ docker run -it ubuntu bash
Share images, automate workflows, and more with a free Docker ID:
https://hub.docker.com/
For more examples and ideas, visit:
https://docs.docker.com/get-started/
至此,安装完成。
卸载方法
要卸载软件本身和删除相关的docker文件1
2$ sudo apt-get purge docker-ce
$ sudo rm -rf /var/lib/docker
docker的一些操作命令
一个简单的示例:1
$ sudo docker run ubuntu:18.04 /bin/echo "Hello world"
或者交互式:1
$ sudo docker run -i -t ubuntu:18.04 /bin/bash
以后台模式启动容器:1
2
3$ sudo docker run -d ubuntu:18.04 /bin/sh -c "while true; do echo hello world; sleep 1; done"
d7c1549c2a495499270eb31819ce5e9ea9748ab8126f025f33b06612491fd447
输出的那一长长的字符串,是容器ID。
查看容器内的标准输出:
sudo docker logs -f {CONTAINER ID}|{NAMES}
示例如下:1
2
3
4
5
6$ sudo docker logs d7c1549c2a495499270eb31819ce5e9ea9748ab8126f025f33b06612491fd447
hello world
hello world
hello world
hello world
hello world
查看正在运行中的容器
1 | $ sudo docker ps |
停止容器,可以使用容器ID或者容器名
1 | $ sudo docker stop {CONTAINER ID}|{NAMES} |
docker的帮助命令
在命令行中直接输入docker即可看到它的提示,如下:1
2
3
4
5
6
7
8
9
10
11
12
13
14
15
16
17
18
19
20
21
22
23
24
25
26
27
28
29
30
31
32
33
34
35
36
37
38
39
40
41
42
43
44
45
46
47
48
49
50
51
52
53
54
55
56
57
58
59
60
61
62
63
64
65
66
67
68
69
70
71
72
73
74
75
76
77
78
79
80
81$ docker
Usage: docker [OPTIONS] COMMAND
A self-sufficient runtime for containers
Options:
--config string Location of client config files (default "/home/hewentian/.docker")
-c, --context string Name of the context to use to connect to the daemon (overrides DOCKER_HOST env var and default context set with "docker context use")
-D, --debug Enable debug mode
-H, --host list Daemon socket(s) to connect to
-l, --log-level string Set the logging level ("debug"|"info"|"warn"|"error"|"fatal") (default "info")
--tls Use TLS; implied by --tlsverify
--tlscacert string Trust certs signed only by this CA (default "/home/hewentian/.docker/ca.pem")
--tlscert string Path to TLS certificate file (default "/home/hewentian/.docker/cert.pem")
--tlskey string Path to TLS key file (default "/home/hewentian/.docker/key.pem")
--tlsverify Use TLS and verify the remote
-v, --version Print version information and quit
Management Commands:
builder Manage builds
config Manage Docker configs
container Manage containers
context Manage contexts
engine Manage the docker engine
image Manage images
network Manage networks
node Manage Swarm nodes
plugin Manage plugins
secret Manage Docker secrets
service Manage services
stack Manage Docker stacks
swarm Manage Swarm
system Manage Docker
trust Manage trust on Docker images
volume Manage volumes
Commands:
attach Attach local standard input, output, and error streams to a running container
build Build an image from a Dockerfile
commit Create a new image from a container's changes
cp Copy files/folders between a container and the local filesystem
create Create a new container
deploy Deploy a new stack or update an existing stack
diff Inspect changes to files or directories on a container's filesystem
events Get real time events from the server
exec Run a command in a running container
export Export a container's filesystem as a tar archive
history Show the history of an image
images List images
import Import the contents from a tarball to create a filesystem image
info Display system-wide information
inspect Return low-level information on Docker objects
kill Kill one or more running containers
load Load an image from a tar archive or STDIN
login Log in to a Docker registry
logout Log out from a Docker registry
logs Fetch the logs of a container
pause Pause all processes within one or more containers
port List port mappings or a specific mapping for the container
ps List containers
pull Pull an image or a repository from a registry
push Push an image or a repository to a registry
rename Rename a container
restart Restart one or more containers
rm Remove one or more containers
rmi Remove one or more images
run Run a command in a new container
save Save one or more images to a tar archive (streamed to STDOUT by default)
search Search the Docker Hub for images
start Start one or more stopped containers
stats Display a live stream of container(s) resource usage statistics
stop Stop one or more running containers
tag Create a tag TARGET_IMAGE that refers to SOURCE_IMAGE
top Display the running processes of a container
unpause Unpause all processes within one or more containers
update Update configuration of one or more containers
version Show the Docker version information
wait Block until one or more containers stop, then print their exit codes
Run 'docker COMMAND --help' for more information on a command.
查找镜像
默认从 https://hub.docker.com/ 查找我们需要的镜像,例如,搜索httpd1
2
3
4
5
6
7$ sudo docker search httpd
NAME DESCRIPTION STARS OFFICIAL AUTOMATED
httpd The Apache HTTP Server Project 2567 [OK]
centos/httpd 23 [OK]
centos/httpd-24-centos7 Platform for running Apache httpd 2.4 or bui… 22
armhf/httpd The Apache HTTP Server Project 8
polinux/httpd-php Apache with PHP in Docker (Supervisor, CentO… 3 [OK]
下载并运行容器
我们可以在 https://hub.docker.com/ 上面查询所有可用的镜像,找到需要的镜像后,可以下载,例如training/webapp:1
2
3
4$ sudo docker pull training/webapp
$ sudo docker run -d -P training/webapp python app.py
a2d42ce3df7d0dc34b93095fe3cd526de22f75f2f49a7762e395c32cecae82e5
我们也可以通过-p参数来设置不一样的端口,(格式为 本机端口:容器端口):1
2
3
4
5
6
7
8$ sudo docker run -d -p 5001:5000 training/webapp python app.py
2f8c4e68d8fbb3130fb51197218b9024bed5de1c4614cd7cca198a68807b57a9
$ sudo docker ps
CONTAINER ID IMAGE COMMAND CREATED STATUS PORTS NAMES
2f8c4e68d8fb training/webapp "python app.py" 27 seconds ago Up 26 seconds 0.0.0.0:5001->5000/tcp infallible_greider
a2d42ce3df7d training/webapp "python app.py" 41 seconds ago Up 40 seconds 0.0.0.0:32769->5000/tcp epic_pasteur
这样在本机的浏览器上面通过如下2种方式,都能访问到应用:
http://localhost:32769/
http://localhost:5001/
查看容器内的进程状况
1 | $ sudo docker top infallible_greider |
查看指定容器的配置和状态信息
1 | $ sudo docker inspect infallible_greider |
容器可以停止、重新启动和移除
1 | $ sudo docker start infallible_greider |
列出本机上的所有镜像
1 | $ sudo docker images |
列出本机上所有已创建的容器
1 | $ sudo docker ps -a |
修改镜像
我们以已存在的ubuntu镜像为原始版本,创建新的镜像1
2
3$ sudo docker run -t -i ubuntu:18.04 /bin/bash
root@d23dc5d88f11:/# apt-get update
root@d23dc5d88f11:/# exit
查看最后创建的容器1
2
3$ sudo docker ps -l
CONTAINER ID IMAGE COMMAND CREATED STATUS PORTS NAMES
d23dc5d88f11 ubuntu:18.04 "/bin/bash" 2 minutes ago Exited (0) About a minute ago amazing_vaughan
可以看到ID为d23dc5d88f11的容器为我们刚才创建的容器,提交这个容器:1
2
3$ sudo docker commit -m="exec apt-get update" -a="hewentian" d23dc5d88f11 hewentian/ubuntu:v2
sha256:2bdf86d10fbc18204e04fe5a30dee06dfeb30683247c41e85e8cfe6d66d5d9d6
查看我们刚刚创建的镜像1
2
3
4
5
6$ sudo docker images
REPOSITORY TAG IMAGE ID CREATED SIZE
hewentian/ubuntu v2 2bdf86d10fbc 6 seconds ago 91MB
ubuntu 18.04 3556258649b2 5 days ago 64.2MB
hello-world latest fce289e99eb9 6 months ago 1.84kB
training/webapp latest 6fae60ef3446 4 years ago 349MB
然后,我们就可以使用我们新建的镜像创建容器了1
2
3
4
5
6
7$ sudo docker run -it hewentian/ubuntu:v2 /bin/bash
root@10adcace776b:/# cat /proc/version
Linux version 4.15.0-47-generic (buildd@lgw01-amd64-001) (gcc version 7.3.0 (Ubuntu 7.3.0-16ubuntu3)) #50-Ubuntu SMP Wed Mar 13 10:44:52 UTC 2019
root@10adcace776b:/# whoami
root
root@10adcace776b:/# exit
exit
创建镜像
从零开始创建一个镜像,我们需要一个Dockerfile文件,示例如下:1
2
3
4
5
6
7
8
9
10$ cat /home/hewentian/Documents/docker/ubuntu/Dockerfile
FROM ubuntu:18.04
MAINTAINER hewentian "wentian.he@qq.com"
ENV AUTHOR="hewentian"
WORKDIR /tmp/
RUN /usr/bin/touch he.txt
RUN /bin/echo "The author is $AUTHOR, created at " >> /tmp/he.txt
RUN /bin/date >> /tmp/he.txt
开始创建镜像1
2
3
4
5
6
7
8
9
10
11
12
13
14
15
16
17
18
19
20
21
22
23
24
25
26
27
28
29
30
31$ sudo docker build -t hewentian/ubuntu:v2.1 -f /home/hewentian/Documents/docker/ubuntu/Dockerfile .
Sending build context to Docker daemon 2.56kB
Step 1/7 : FROM ubuntu:18.04
---> 3556258649b2
Step 2/7 : MAINTAINER hewentian "wentian.he@qq.com"
---> Running in 9684fd7dab36
Removing intermediate container 9684fd7dab36
---> 87f25ba61a99
Step 3/7 : ENV AUTHOR="hewentian"
---> Running in 22e933129053
Removing intermediate container 22e933129053
---> 23c5a574b01c
Step 4/7 : WORKDIR /tmp/
---> Running in a4341dbc2164
Removing intermediate container a4341dbc2164
---> 94663075f2b0
Step 5/7 : RUN /usr/bin/touch he.txt
---> Running in e54479ffd964
Removing intermediate container e54479ffd964
---> a196207c63e9
Step 6/7 : RUN /bin/echo "The author is $AUTHOR, created at " >> /tmp/he.txt
---> Running in 89d010bd1b78
Removing intermediate container 89d010bd1b78
---> 11aa9b6d3605
Step 7/7 : RUN /bin/date >> /tmp/he.txt
---> Running in 66627425d24c
Removing intermediate container 66627425d24c
---> c6cd98aa1461
Successfully built c6cd98aa1461
Successfully tagged hewentian/ubuntu:v2.1
查看生成的镜像1
2
3
4
5
6
7$ sudo docker images
REPOSITORY TAG IMAGE ID CREATED SIZE
hewentian/ubuntu v2.1 c6cd98aa1461 43 seconds ago 64.2MB
hewentian/ubuntu v2 2bdf86d10fbc 18 hours ago 91MB
ubuntu 18.04 3556258649b2 6 days ago 64.2MB
hello-world latest fce289e99eb9 7 months ago 1.84kB
training/webapp latest 6fae60ef3446 4 years ago 349MB
用我们新建的镜像创建容器1
2
3
4
5
6
7
8
9$ sudo docker run -it hewentian/ubuntu:v2.1 /bin/bash
root@335d56425694:/tmp# ls /tmp/
he.txt
root@335d56425694:/tmp# more /tmp/he.txt
The author is hewentian, created at
Tue Jul 30 03:10:50 UTC 2019
root@335d56425694:/tmp# exit
exit
可见,镜像包含我们自已创建的文件。
将JAR程序部署到容器中
假设我们现在有一个springBoot的WEB项目,里面有一个接口/hello,已经打好了JAR包。我们要将它部署到容器中运行,目录结构如下:1
2
3
4
5$ pwd
/home/hewentian/Documents/docker/showIp
$ ls
Dockerfile showIp-1.0.0.jar
我们创建一个镜像,因此需要一个Dockerfile文件,如下:1
2
3
4
5
6
7
8$ cat /home/hewentian/Documents/docker/showIp/Dockerfile
FROM java:8
MAINTAINER hewentian "wentian.he@qq.com"
ADD showIp-1.0.0.jar showIp.jar
EXPOSE 8080
ENTRYPOINT ["java","-jar","showIp.jar"]
开始创建镜像1
2
3
4
5
6
7
8
9
10
11
12
13
14
15
16
17
18
19
20
21$ cd /home/hewentian/Documents/docker/showIp/
$ sudo docker build -t hewentian/show-ip:v1.0.0 -f /home/hewentian/Documents/docker/showIp/Dockerfile .
Sending build context to Docker daemon 13.4MB
Step 1/5 : FROM java:8
---> d23bdf5b1b1b
Step 2/5 : MAINTAINER hewentian "wentian.he@qq.com"
---> Using cache
---> 8ef66d4bf19b
Step 3/5 : ADD showIp-1.0.0.jar showIp.jar
---> 74faf7fe0fdf
Step 4/5 : EXPOSE 8080
---> Running in 605f90040e44
Removing intermediate container 605f90040e44
---> 2de558b34abc
Step 5/5 : ENTRYPOINT ["java","-jar","showIp.jar"]
---> Running in e8436a5ea5e0
Removing intermediate container e8436a5ea5e0
---> 5f89e1fe5e7e
Successfully built 5f89e1fe5e7e
Successfully tagged hewentian/show-ip:v1.0.0
运行新创建的镜像:1
$ sudo docker run -p 8081:8080 -d hewentian/show-ip:v1.0.0
运行成功后,可以访问:
http://localhost:8081/hello
docker安装nginx
首先拉取镜像1
2
3
4
5
6
7
8
9
10
11$ sudo docker search nginx
$ sudo docker pull nginx
$ sudo docker images
REPOSITORY TAG IMAGE ID CREATED SIZE
hewentian/ubuntu v2.1 c6cd98aa1461 4 hours ago 64.2MB
hewentian/ubuntu v2 2bdf86d10fbc 22 hours ago 91MB
nginx latest e445ab08b2be 6 days ago 126MB
ubuntu 18.04 3556258649b2 6 days ago 64.2MB
hello-world latest fce289e99eb9 7 months ago 1.84kB
training/webapp latest 6fae60ef3446 4 years ago 349MB
使用nginx的默认配置来启动一个容器:1
2
3$ sudo docker run --name nginx-test -p 8081:80 -d nginx
838ebabcc937cf9a8e13946f92d104b2eb153cc61f21cb47e7661d6bbe205253
如果启动成功,则可以在浏览器中访问:
http://localhost:8081/
然后,开始部署我们想要的nginx,首先在本机上创建nginx相关文件目录1
2$ cd /home/hewentian/Documents/docker
$ mkdir -p nginx/www nginx/logs nginx/conf
将刚才启动的nginx容器内的配置文件,复制到本机中:1
$ sudo docker cp 838ebabcc937:/etc/nginx/nginx.conf /home/hewentian/Documents/docker/nginx/conf
docker cp: 用于本地主机与容器之间的数据复制
创建nginx欢迎页面/home/hewentian/Documents/docker/nginx/www/index.html:1
2
3
4
5
6
7
8
9
10
11
12
13
14
15
16
17
18
19
20
21
22
23
24
25
<html>
<head>
<title>Welcome to nginx!</title>
<style>
body {
width: 35em;
margin: 0 auto;
font-family: Tahoma, Verdana, Arial, sans-serif;
}
</style>
</head>
<body>
<h1>Welcome to docker nginx!</h1>
<p>If you see this page, the nginx web server is successfully installed and
working. Further configuration is required.</p>
<p>For online documentation and support please refer to
<a href="http://nginx.org/">nginx.org</a>.<br/>
Commercial support is available at
<a href="http://nginx.com/">nginx.com</a>.</p>
<p><em>Thank you for using nginx.</em></p>
</body>
</html>
启动nginx:1
$ sudo docker run --name nginx-test2 -p 8082:80 -d -v /home/hewentian/Documents/docker/nginx/www:/usr/share/nginx/html -v /home/hewentian/Documents/docker/nginx/conf/nginx.conf:/etc/nginx/nginx.conf -v /home/hewentian/Documents/docker/nginx/logs:/var/log/nginx nginx
参数说明:
-v /home/hewentian/Documents/docker/nginx/www:/usr/share/nginx/html:将在本机创建的目录,挂载到容器内的/usr/share/nginx/html目录
如果启动成功,则可以在浏览器中访问:
http://localhost:8082/
docker安装redis
先建立保存数据的目录和设置好配置文件:1
2
3
4
5
6
7
8
9
10
11
12
13
14$ cd /root/db/redis
$ mkdir data conf
$ cd conf
$ vi redis.conf
requirepass abc12345
appendonly yes
appendfilename "appendonly.aof"
appendfsync everysec
no-appendfsync-on-rewrite no
auto-aof-rewrite-percentage 100
auto-aof-rewrite-min-size 64mb
aof-load-truncated yes
开始安装1
2
3
4
5
6
7
8$ sudo docker pull redis
$
$ sudo docker run \
--name redis \
-p 6379:6379 \
-v /root/db/redis/conf/redis.conf:/etc/redis/redis.conf \
-v /root/db/redis/data:/data \
-d redis redis-server /etc/redis/redis.conf
docker安装mysql
先建立保存数据的目录和设置好配置文件:1
2
3
4
5
6
7
8
9
10
11
12
13
14
15
16$ cd /root/db/mysql
$ mkdir data conf logs
$ cd conf
$ vi mysql.cnf
[client]
port=3306
default-character-set=utf8
[mysql]
default-character-set=utf8
[mysqld]
port=3306
character-set-server=utf8
max_connections=100
拉取镜像1
2
3
4
5
6
7
8
9
10
11
12$ sudo docker search mysql
$ sudo docker pull mysql:5.6.42
$ sudo docker images
REPOSITORY TAG IMAGE ID CREATED SIZE
hewentian/ubuntu v2.1 c6cd98aa1461 4 hours ago 64.2MB
hewentian/ubuntu v2 2bdf86d10fbc 22 hours ago 91MB
nginx latest e445ab08b2be 6 days ago 126MB
ubuntu 18.04 3556258649b2 6 days ago 64.2MB
hello-world latest fce289e99eb9 7 months ago 1.84kB
training/webapp latest 6fae60ef3446 4 years ago 349MB
mysql 5.6.42 27e29668a08a 12 months ago 256MB
运行容器
简单安装
1
2
3
4
5$ sudo docker run \
-itd --name mysql-hwt \
-p 3306:3306 \
-e MYSQL_ROOT_PASSWORD=123456 \
mysql:5.6.42详细安装
1
2
3
4
5
6
7
8
9
10
11
12
13$ sudo docker run \
-itd --name mysql-hwt \
-p 3306:3306 \
-v /root/db/mysql/conf/mysql.cnf:/etc/mysql/conf.d/mysql.cnf \
-v /root/db/mysql/data:/var/lib/mysql \
-v /root/db/mysql/logs:/logs \
-e MYSQL_ROOT_PASSWORD=123456 \
mysql:5.6.42
$ sudo docker ps
CONTAINER ID IMAGE COMMAND CREATED STATUS PORTS NAMES
524097ed5349 mysql:5.6.42 "docker-entrypoint.s…" 3 minutes ago Up 3 minutes 0.0.0.0:3306->3306/tcp mysql-hwt
进入mysql,将root用户密码修改,并且禁用root远程登录1
2
3
4
5$ sudo docker exec -it mysql-hwt mysql -uroot -p123456
mysql> GRANT ALL ON *.* TO 'root'@'localhost' IDENTIFIED BY 'root';
mysql> DELETE FROM mysql.user WHERE User='root' AND Host NOT IN ('localhost', '127.0.0.1', '::1');
mysql> FLUSH PRIVILEGES;
修改mysql的默认字符编码为UTF-8,打开容器中的/etc/mysql/conf.d/mysql.cnf,增加如下内容即可(其中最后三行为原有的内容)。1
2
3
4
5
6
7
8
9
10
11
12
13
14
15[client]
default-character-set=utf8
[mysql]
default-character-set=utf8
[mysqld]
init_connect='SET collation_connection = utf8_unicode_ci'
init_connect='SET NAMES utf8'
character-set-server=utf8
collation-server=utf8_unicode_ci
log_bin=mysql-bin
binlog_format=ROW
server_id=1
重启mysql,然后查看编码。1
2
3
4
5
6
7
8
9
10
11
12
13
14
15
16
17$ sudo docker restart mysql-hwt-5.7
mysql> show variables like 'char%';
+--------------------------+----------------------------+
| Variable_name | Value |
+--------------------------+----------------------------+
| character_set_client | utf8 |
| character_set_connection | utf8 |
| character_set_database | utf8 |
| character_set_filesystem | binary |
| character_set_results | utf8 |
| character_set_server | utf8 |
| character_set_system | utf8 |
| character_sets_dir | /usr/share/mysql/charsets/ |
+--------------------------+----------------------------+
8 rows in set (0.01 sec)
然后创建一个用于操作mysql的简单用户,参考之前的 mysql 学习笔记。
docker安装mongo
先建立保存数据的目录和设置好配置文件:1
2
3
4
5
6
7
8
9$ cd /root/db/mongodb
$ mkdir configdb data logs
$ cd configdb
$ vi mongod.conf
systemLog:
destination: file
logAppend: true
path: /var/log/mongodb/mongod.log
开始安装1
2
3
4
5
6
7
8
9
10
11$ sudo docker pull mongo
$
$ sudo docker run \
-itd --name mongo \
-p 27017:27017 \
-v /root/db/mongodb/data:/data/db \
-v /root/db/mongodb/configdb:/data/configdb \
-v /root/db/mongodb/logs:/data/logs \
mongo:latest --auth \
-f /data/configdb/mongod.conf \
--bind_ip_all
进入mongo,添加管理员。创建第一个用户admin,该用户需要有用户管理权限,其角色为root。
1
2
3
4
5
6
7
8
9
10
11
12
13
14
15
16
17
18
19
20
21
22
23
24
25
26
27
28
29
30$ sudo docker exec -it mongo mongo
MongoDB shell version v4.2.7
connecting to: mongodb://127.0.0.1:27017/?compressors=disabled&gssapiServiceName=mongodb
Implicit session: session { "id" : UUID("81ad33aa-6318-4854-98df-9910a8927698") }
MongoDB server version: 4.2.7
Welcome to the MongoDB shell.
For interactive help, type "help".
For more comprehensive documentation, see
http://docs.mongodb.org/
Questions? Try the support group
http://groups.google.com/group/mongodb-user
> use admin
switched to db admin
>
>
> db.createUser({user:"admin",pwd:"12345",roles:["root"]})
Successfully added user: { "user" : "admin", "roles" : [ "root" ] }
>
>
> show collections
Warning: unable to run listCollections, attempting to approximate collection names by parsing connectionStatus
>
>
> db.auth("admin","12345")
1
>
> show collections
system.users
system.version
>添加数据库用户
为数据库添加用户,添加用户前需要切换到该数据库,这里简单设置其角色为dbOwner1
2
3
4
5
6
7
8
9
10
11
12
13
14> use bfg
switched to db bfg
>
>
> db.createUser({user: "bfg", pwd: "bfg100", roles: [{ role: "dbOwner", db: "bfg" }]})
Successfully added user: {
"user" : "bfg",
"roles" : [
{
"role" : "dbOwner",
"db" : "bfg"
}
]
}
docker安装rabbitmq
- 简单安装
1
2
3
4
5
6
7
8
9$ sudo docker pull rabbitmq:3.8.9-management
$
$ sudo docker run \
-itd --name rabbitmq-hwt \
-p 5672:5672 \
-p 15672:15672 \
-e RABBITMQ_DEFAULT_USER=admin \
-e RABBITMQ_DEFAULT_PASS=admin \
rabbitmq:3.8.9-management
访问WEB界面:
http://192.168.56.113:15672/
docker安装zookeeper
- 简单安装
先建立保存数据的目录和设置好配置文件:1
2$ cd /root/db/zookeeper
$ mkdir data datalog logs
开始安装1
2
3
4
5
6
7
8
9
10
11
12$ sudo docker pull zookeeper:3.6.2
$
$ sudo docker run \
-itd --name zookeeper-hwt \
-p 2181:2181 \
-e ZOO_TICK_TIME=2000 \
-e ZOO_INIT_LIMIT=10 \
-e ZOO_SYNC_LIMIT=5 \
-v /root/db/zookeeper/data:/data \
-v /root/db/zookeeper/datalog:/datalog \
-v /root/db/zookeeper/logs:/logs \
zookeeper:3.6.2
客户端登录1
2$ sudo docker exec -it zookeeper-hwt zkCli.sh
Connecting to localhost:2181
docker安装kafka
- 简单安装
先建立保存数据的目录和设置好配置文件:1
2$ cd /root/db/kafka
$
开始安装1
2
3
4
5
6
7
8
9
10
11$ sudo docker pull wurstmeister/kafka:2.13-2.7.0
$
$ sudo docker run \
-itd --name kafka-hwt \
-p 9092:9092 \
-e KAFKA_BROKER_ID=0 \
-e KAFKA_ZOOKEEPER_CONNECT=192.168.56.113:2181/kafka \
-e KAFKA_ADVERTISED_LISTENERS=PLAINTEXT://192.168.56.113:9092 \
-e KAFKA_LISTENERS=PLAINTEXT://0.0.0.0:9092 \
-v /root/db/kafka:/kafka \
wurstmeister/kafka:2.13-2.7.0
验证kafka是否可以使用1
2
3
4
5
6
7
8
9$ sudo docker exec -it kafka-hwt bash
$ cd /opt/kafka/bin/
$
$ 发送消息
$ ./kafka-console-producer.sh --broker-list localhost:9092 --topic redsuns
> hello word
$
$ 接收消息
$ ./kafka-console-consumer.sh --bootstrap-server localhost:9092 --topic redsuns --from-beginning
注意:因为上面的KAFKA_ZOOKEEPER_CONNECT将kafka的数据保存到了/kafka目录下,所以,当我们使用Kafka Tool工具连接kafka的时候要记得配置chroot path: /kafka,否则连不上。
docker安装zipkin
拉取镜像1
$ sudo docker pull openzipkin/zipkin
- 简单安装(数据保存到内存中)
1
2
3
4$ sudo docker run \
-itd --name zipkin-hwt \
-p 9411:9411 \
openzipkin/zipkin
访问WEB界面:
http://192.168.56.113:9411/zipkin/
- 详细安装(数据保存到mysql中,并且从消息队列中读取数据)
1
2
3
4
5
6
7
8
9
10
11
12
13$ sudo docker run \
-itd --name zipkin-hwt \
-p 9411:9411 \
-e STORAGE_TYPE=mysql \
-e MYSQL_HOST=192.168.56.113 \
-e MYSQL_TCP_PORT=3306 \
-e MYSQL_DB=zipkin \
-e MYSQL_USER=zipkin \
-e MYSQL_PASS=HFWM8DBv6nfPXKg2 \
-e RABBIT_ADDRESSES=192.168.56.113:5672 \
-e RABBIT_USER=admin \
-e RABBIT_PASSWORD=admin \
openzipkin/zipkin
进入指定的容器
若启动容器的时候不是以交互模式,之后又想进入容器,则可以使用如下命令:1
2
3
4
5
6
7
8
9
10
11
12
13
14
15
16
17
18
19
20
21先启动一个之前停止了的容器
$ sudo docker start 3063341debf2
3063341debf2
直接运行容器内的脚本
$ sudo docker exec -it 3063341debf2 /bin/bash /a.sh
Wed Jul 31 01:40:20 UTC 2019
以交互模式进入容器
$ sudo docker exec -it 3063341debf2 /bin/bash
root@3063341debf2:/# ls
a.sh bin boot dev etc home lib lib64 media mnt opt proc root run sbin srv sys tmp usr var
root@3063341debf2:/# sh a.sh
Wed Jul 31 01:44:34 UTC 2019
root@3063341debf2:/# exit
exit
退出后,容器并不会停止
$ sudo docker ps
CONTAINER ID IMAGE COMMAND CREATED STATUS PORTS NAMES
3063341debf2 ubuntu:18.04 "/bin/bash" 41 hours ago Up 18 seconds friendly_poitras
另外,使用attach命令也能进入容器,但是当退出后,容器会停止1
2
3
4
5
6
7
8
9
10
11
12
13
14$ sudo docker ps
CONTAINER ID IMAGE COMMAND CREATED STATUS PORTS NAMES
3063341debf2 ubuntu:18.04 "/bin/bash" 41 hours ago Up 18 seconds friendly_poitras
$ sudo docker attach --sig-proxy=false 3063341debf2
root@3063341debf2:/# ls
a.sh bin boot dev etc home lib lib64 media mnt opt proc root run sbin srv sys tmp usr var
root@3063341debf2:/# sh a.sh
Wed Jul 31 02:02:50 UTC 2019
root@3063341debf2:/# exit
exit
$ sudo docker ps
CONTAINER ID IMAGE COMMAND CREATED STATUS PORTS NAMES
将镜像导出/导入
导出镜像语法:1
2
3
4
5
6
7
8$ sudo docker save --help
Usage: docker save [OPTIONS] IMAGE [IMAGE...]
Save one or more images to a tar archive (streamed to STDOUT by default)
Options:
-o, --output string Write to a file, instead of STDOUT
导入镜像语法:1
2
3
4
5
6
7
8
9$ sudo docker load --help
Usage: docker load [OPTIONS]
Load an image from a tar archive or STDIN
Options:
-i, --input string Read from tar archive file, instead of STDIN
-q, --quiet Suppress the load output
示例:先将镜像导出,然后删除镜像,最后再将导出的镜像重新导入:1
2
3
4
5
6
7
8
9
10
11
12
13
14
15
16
17
18
19
20
21
22
23
24
25
26
27
28
29
30
31
32
33
34
35
36
37
38
39$ sudo docker images
REPOSITORY TAG IMAGE ID CREATED SIZE
<none> <none> c6cd98aa1461 27 hours ago 64.2MB
hewentian/ubuntu v2 2bdf86d10fbc 45 hours ago 91MB
nginx latest e445ab08b2be 7 days ago 126MB
ubuntu 18.04 3556258649b2 7 days ago 64.2MB
hello-world latest fce289e99eb9 7 months ago 1.84kB
training/webapp latest 6fae60ef3446 4 years ago 349MB
$ sudo docker save -o hu.tar hewentian/ubuntu:v2
$ ls
hu.tar
$ sudo docker rmi 2bdf86d10fbc
Untagged: hewentian/ubuntu:v2
Deleted: sha256:2bdf86d10fbc18204e04fe5a30dee06dfeb30683247c41e85e8cfe6d66d5d9d6
Deleted: sha256:c4a9226f13fa8f48ef07e27e0954c43f38275b6aa1d24e361ed016dfff056069
$ sudo docker images
REPOSITORY TAG IMAGE ID CREATED SIZE
<none> <none> c6cd98aa1461 27 hours ago 64.2MB
nginx latest e445ab08b2be 7 days ago 126MB
ubuntu 18.04 3556258649b2 7 days ago 64.2MB
hello-world latest fce289e99eb9 7 months ago 1.84kB
training/webapp latest 6fae60ef3446 4 years ago 349MB
$ sudo docker load -i hu.tar
ed4797628ae8: Loading layer [==================================================>] 26.85MB/26.85MB
Loaded image: hewentian/ubuntu:v2
$ sudo docker images
REPOSITORY TAG IMAGE ID CREATED SIZE
<none> <none> c6cd98aa1461 27 hours ago 64.2MB
hewentian/ubuntu v2 2bdf86d10fbc 45 hours ago 91MB
nginx latest e445ab08b2be 7 days ago 126MB
ubuntu 18.04 3556258649b2 7 days ago 64.2MB
hello-world latest fce289e99eb9 7 months ago 1.84kB
training/webapp latest 6fae60ef3446 4 years ago 349MB
或者使用压缩方式导出导入
$ sudo docker save mysql:5.6.42 | gzip > mysql-5.6.42.tar.gz
$ sudo docker load < mysql-5.6.42.tar.gz
注意:导出镜像的时候,要使用REPOSITORY:TAG,而不是IMAGE ID,否则在重新导入的时候会没有REPOSITORY:TAG,显示为none
使用import创建镜像
也可以从导出的tar文件中创建一个新的镜像,语法如下:1
2
3
4
5
6
7
8
9$ sudo docker import --help
Usage: docker import [OPTIONS] file|URL|- [REPOSITORY[:TAG]]
Import the contents from a tarball to create a filesystem image
Options:
-c, --change list Apply Dockerfile instruction to the created image
-m, --message string Set commit message for imported image
示例:1
2
3
4
5
6
7
8
9
10
11$ sudo docker import hu.tar hewentian/ubuntu:v2.1
sha256:c389673d68c576b08ad8e3c2337de4ee3b4ed7e622fa986771323797edd2d595
$ sudo docker images
REPOSITORY TAG IMAGE ID CREATED SIZE
hewentian/ubuntu v2.1 c389673d68c5 5 seconds ago 66.6MB
hewentian/ubuntu v2 2bdf86d10fbc 45 hours ago 91MB
nginx latest e445ab08b2be 7 days ago 126MB
ubuntu 18.04 3556258649b2 7 days ago 64.2MB
hello-world latest fce289e99eb9 7 months ago 1.84kB
training/webapp latest 6fae60ef3446 4 years ago 349MB
我试过使用import进去的镜像来创建容器,但是失败了,留待以后再解决
登录/登出镜像仓库
默认登录/登出官方仓库 https://hub.docker.com/ ,不过,也可以登录到指定的私有仓库。
登录语法:1
2
3
4
5
6
7
8
9
10
11$ sudo docker login --help
Usage: docker login [OPTIONS] [SERVER]
Log in to a Docker registry.
If no server is specified, the default is defined by the daemon.
Options:
-p, --password string Password
--password-stdin Take the password from stdin
-u, --username string Username
登出语法:1
2
3
4
5
6$ sudo docker logout --help
Usage: docker logout [SERVER]
Log out from a Docker registry.
If no server is specified, the default is defined by the daemon.
登录/登出示例:1
2
3
4
5
6
7
8
9
10
11$ sudo docker login -u hewentian
Password:
WARNING! Your password will be stored unencrypted in /home/hewentian/.docker/config.json.
Configure a credential helper to remove this warning. See
https://docs.docker.com/engine/reference/commandline/login/#credentials-store
Login Succeeded
$ sudo docker logout
Removing login credentials for https://index.docker.io/v1/
将本地镜像上传到镜像仓库
默认上传到docker官方仓库docker.io,上传到私有仓库的例子,后面会介绍。1
2
3
4$ sudo docker push hewentian/ubuntu:v2.1
The push refers to repository [docker.io/hewentian/ubuntu]
8c29bfccf50c: Pushed
v2.1: digest: sha256:992cc4e008449d8285387fe80aff3c9b0574360fc3ad21b04bccc5b6a4229923 size: 528
harbor的安装
我们将在机器192.168.56.113上面安装harbor,安装过程参考这里:
https://github.com/goharbor/harbor
harbor依赖docker 17.06.0-ce+、docker-compose 1.18.0+,其中dock-ce的安装参照上文。
安装docker-compose,参考: https://docs.docker.com/compose/install/#install-compose1
2
3
4
5$ sudo curl -L "https://github.com/docker/compose/releases/download/1.24.1/docker-compose-$(uname -s)-$(uname -m)" -o /usr/local/bin/docker-compose
$ sudo chmod +x /usr/local/bin/docker-compose
$ docker-compose -version
docker-compose version 1.24.1, build 4667896b
开始安装harbor,安装之前需要启动docker,参考: https://github.com/goharbor/harbor/blob/master/docs/installation_guide.md
下载离线安装包,在 https://github.com/goharbor/harbor/releases 下载最新版本1
2
3
4
5
6$ cd /home/hadoop
$ wget https://storage.googleapis.com/harbor-releases/release-1.8.0/harbor-offline-installer-v1.8.2-rc1.tgz
$ tar xf harbor-offline-installer-v1.8.2-rc1.tgz
$ cd harbor
$ ls
harbor.v1.8.2.tar.gz harbor.yml install.sh LICENSE prepare
安装前的配置,配置文件harbor.yml中hostname可以配置成IP地址或域名,主要是用于给客户端登录使用:
首先查看本机的hostname和IP地址1
2
3
4
5
6
7
8
9
10
11
12$ hostname
hadoop-host-slave-3
$ ifconfig
enp0s3: flags=4163<UP,BROADCAST,RUNNING,MULTICAST> mtu 1500
inet 192.168.56.113 netmask 255.255.255.0 broadcast 192.168.56.255
inet6 fe80::90f2:2a79:288c:984e prefixlen 64 scopeid 0x20<link>
ether 08:00:27:9f:8e:7e txqueuelen 1000 (Ethernet)
RX packets 4726 bytes 448939 (448.9 KB)
RX errors 0 dropped 0 overruns 0 frame 0
TX packets 7637 bytes 9739346 (9.7 MB)
TX errors 0 dropped 0 overruns 0 carrier 0 collisions 0
可以看到hostname是hadoop-host-slave-3,而IP地址是192.168.56.113。这里我们将hostname配置成hadoop-host-slave-3,如下:1
2
3
4$ cd /home/hadoop/harbor
$ vi harbor.yml
hostname: hadoop-host-slave-3
开始安装,执行一个安装脚本即可:1
2$ cd /home/hadoop/harbor
$ sudo ./install.sh
如无意外,你会看到如下的安装日志:1
2
3
4
5
6
7
8
9
10
11
12
13
14
15
16
17
18
19
20
21
22
23
24
25
26
27
28
29
30
31
32
33
34
35
36
37
38
39
40
41
42
43
44
45
46
47
48
49
50
51
52
53
54
55
56
57
58
59
60
61
62
63
64
65
66
67
68
69
70
71
72
73
74
75
76
77
78
79
80
81
82
83
84
85
86
87
88
89
90
91
92
93
94
95
96
97
98
99
100
101
102
103
104
105
106
107
108
109
110
111
112
113
114
115
116
117
118
119
120
121
122
123
124
125
126
127
128
129
130
131
132
133
134
135
136[sudo] password for hadoop:
[Step 0]: checking installation environment ...
Note: docker version: 19.03.1
Note: docker-compose version: 1.24.1
[Step 1]: loading Harbor images ...
39b2d676308e: Loading layer [==================================================>] 33.47MB/33.47MB
f3583ea30104: Loading layer [==================================================>] 3.552MB/3.552MB
8290f582ffa5: Loading layer [==================================================>] 6.59MB/6.59MB
19913bc5e52b: Loading layer [==================================================>] 161.3kB/161.3kB
ae8b73743d1b: Loading layer [==================================================>] 215kB/215kB
5c811d1fe61a: Loading layer [==================================================>] 3.584kB/3.584kB
Loaded image: goharbor/harbor-portal:v1.8.2
f27812f7a2da: Loading layer [==================================================>] 8.971MB/8.971MB
c74d2b18a2d1: Loading layer [==================================================>] 38.82MB/38.82MB
c416e128ff4c: Loading layer [==================================================>] 38.82MB/38.82MB
Loaded image: goharbor/harbor-jobservice:v1.8.2
e97909585a09: Loading layer [==================================================>] 8.972MB/8.972MB
23b18d08698d: Loading layer [==================================================>] 3.072kB/3.072kB
9c1d8c03df3e: Loading layer [==================================================>] 20.1MB/20.1MB
9666a22cf141: Loading layer [==================================================>] 3.072kB/3.072kB
95783fa51b82: Loading layer [==================================================>] 7.465MB/7.465MB
285e05bca91e: Loading layer [==================================================>] 27.56MB/27.56MB
Loaded image: goharbor/harbor-registryctl:v1.8.2
6543a3ba9bd9: Loading layer [==================================================>] 338MB/338MB
43f486f0ed18: Loading layer [==================================================>] 107kB/107kB
Loaded image: goharbor/harbor-migrator:v1.8.2
6710d86773e1: Loading layer [==================================================>] 50.51MB/50.51MB
dba91d68db46: Loading layer [==================================================>] 3.584kB/3.584kB
4b6a61fc3477: Loading layer [==================================================>] 3.072kB/3.072kB
efd64eeb5c31: Loading layer [==================================================>] 2.56kB/2.56kB
25d50c6108dd: Loading layer [==================================================>] 3.072kB/3.072kB
6c22404ddaf0: Loading layer [==================================================>] 3.584kB/3.584kB
135fef0d64a7: Loading layer [==================================================>] 12.29kB/12.29kB
Loaded image: goharbor/harbor-log:v1.8.2
f080cac48a5f: Loading layer [==================================================>] 3.552MB/3.552MB
Loaded image: goharbor/nginx-photon:v1.8.2
9562b05e7bd1: Loading layer [==================================================>] 8.971MB/8.971MB
2ff1ba9952dc: Loading layer [==================================================>] 5.143MB/5.143MB
463651a0baca: Loading layer [==================================================>] 15.13MB/15.13MB
feceecff30a6: Loading layer [==================================================>] 26.47MB/26.47MB
a2d1a1b1eaaa: Loading layer [==================================================>] 22.02kB/22.02kB
2c8463eca215: Loading layer [==================================================>] 3.072kB/3.072kB
7e91f466c852: Loading layer [==================================================>] 46.74MB/46.74MB
Loaded image: goharbor/notary-server-photon:v0.6.1-v1.8.2
628aac791456: Loading layer [==================================================>] 113MB/113MB
32e13bd19d15: Loading layer [==================================================>] 10.94MB/10.94MB
17d6a3366a31: Loading layer [==================================================>] 2.048kB/2.048kB
9c3d274d3072: Loading layer [==================================================>] 48.13kB/48.13kB
a3e8bc524efe: Loading layer [==================================================>] 3.072kB/3.072kB
6edf120ab0a5: Loading layer [==================================================>] 10.99MB/10.99MB
Loaded image: goharbor/clair-photon:v2.0.8-v1.8.2
fa7f8bd666e1: Loading layer [==================================================>] 8.972MB/8.972MB
d23a3ac1da5c: Loading layer [==================================================>] 3.072kB/3.072kB
25ece37b9b62: Loading layer [==================================================>] 2.56kB/2.56kB
ceff80c4799d: Loading layer [==================================================>] 20.1MB/20.1MB
4ddaf99a2326: Loading layer [==================================================>] 20.1MB/20.1MB
Loaded image: goharbor/registry-photon:v2.7.1-patch-2819-v1.8.2
86ef8960f9fa: Loading layer [==================================================>] 13.72MB/13.72MB
4be07cab0847: Loading layer [==================================================>] 26.47MB/26.47MB
b3f2bb8db417: Loading layer [==================================================>] 22.02kB/22.02kB
4c68837d983b: Loading layer [==================================================>] 3.072kB/3.072kB
f2526a5c0965: Loading layer [==================================================>] 45.33MB/45.33MB
Loaded image: goharbor/notary-signer-photon:v0.6.1-v1.8.2
9c6a2b28994d: Loading layer [==================================================>] 2.56kB/2.56kB
49bb4e719955: Loading layer [==================================================>] 1.536kB/1.536kB
47d1a63f5482: Loading layer [==================================================>] 69.81MB/69.81MB
db449d60801c: Loading layer [==================================================>] 39.75MB/39.75MB
f01c7fa07db7: Loading layer [==================================================>] 144.4kB/144.4kB
5ff7a32e9f2c: Loading layer [==================================================>] 3.005MB/3.005MB
Loaded image: goharbor/prepare:v1.8.2
6602e119ecab: Loading layer [==================================================>] 8.971MB/8.971MB
6b45eae45c58: Loading layer [==================================================>] 46.86MB/46.86MB
e3d9614f88b3: Loading layer [==================================================>] 5.632kB/5.632kB
f0b457c2a1b1: Loading layer [==================================================>] 28.67kB/28.67kB
f4e712369f36: Loading layer [==================================================>] 46.86MB/46.86MB
Loaded image: goharbor/harbor-core:v1.8.2
c39fa71cb1b3: Loading layer [==================================================>] 63.4MB/63.4MB
245ad05b59aa: Loading layer [==================================================>] 50.88MB/50.88MB
6fc4b5ec5705: Loading layer [==================================================>] 6.656kB/6.656kB
8a003956ed73: Loading layer [==================================================>] 2.048kB/2.048kB
0b4d3b06d5d5: Loading layer [==================================================>] 7.68kB/7.68kB
c045e2109691: Loading layer [==================================================>] 2.56kB/2.56kB
eef5f9c09eb0: Loading layer [==================================================>] 2.56kB/2.56kB
75776554d401: Loading layer [==================================================>] 2.56kB/2.56kB
Loaded image: goharbor/harbor-db:v1.8.2
0130cb61aaba: Loading layer [==================================================>] 74.58MB/74.58MB
9f0973beb46c: Loading layer [==================================================>] 3.072kB/3.072kB
74bd291b6f8b: Loading layer [==================================================>] 59.9kB/59.9kB
3b11caba8d3e: Loading layer [==================================================>] 61.95kB/61.95kB
Loaded image: goharbor/redis-photon:v1.8.2
5b00b48e6ec3: Loading layer [==================================================>] 8.976MB/8.976MB
7f5008b71ec6: Loading layer [==================================================>] 44.39MB/44.39MB
02f96d3b6e35: Loading layer [==================================================>] 2.048kB/2.048kB
da8354357ee3: Loading layer [==================================================>] 3.072kB/3.072kB
1819913851a3: Loading layer [==================================================>] 44.4MB/44.4MB
Loaded image: goharbor/chartmuseum-photon:v0.9.0-v1.8.2
[Step 2]: preparing environment ...
prepare base dir is set to /home/hadoop/harbor
Generated configuration file: /config/log/logrotate.conf
Generated configuration file: /config/nginx/nginx.conf
Generated configuration file: /config/core/env
Generated configuration file: /config/core/app.conf
Generated configuration file: /config/registry/config.yml
Generated configuration file: /config/registryctl/env
Generated configuration file: /config/db/env
Generated configuration file: /config/jobservice/env
Generated configuration file: /config/jobservice/config.yml
Generated and saved secret to file: /secret/keys/secretkey
Generated certificate, key file: /secret/core/private_key.pem, cert file: /secret/registry/root.crt
Generated configuration file: /compose_location/docker-compose.yml
Clean up the input dir
[Step 3]: starting Harbor ...
Creating network "harbor_harbor" with the default driver
Creating harbor-log ... done
Creating redis ... done
Creating registryctl ... done
Creating registry ... done
Creating harbor-db ... done
Creating harbor-core ... done
Creating harbor-portal ... done
Creating harbor-jobservice ... done
Creating nginx ... done
✔ ----Harbor has been installed and started successfully.----
Now you should be able to visit the admin portal at http://hadoop-host-slave-3.
For more details, please visit https://github.com/goharbor/harbor .
按照上面的提示,我们在浏览器中访问
http://hadoop-host-slave-3
http://harbor.hewentian.com
在访问之前,我们需要在本地机器中配置一下hosts,添加如下两行1
2
3
4$ more /etc/hosts
192.168.56.113 hadoop-host-slave-3
192.168.56.113 harbor.hewentian.com
为方便docker将镜像上传到私有harbor,这里多配置一个域名。所以访问上面所列的两个站点,结果是一样的。后面的操作,我们使用harbor.hewentian.com这个域名。
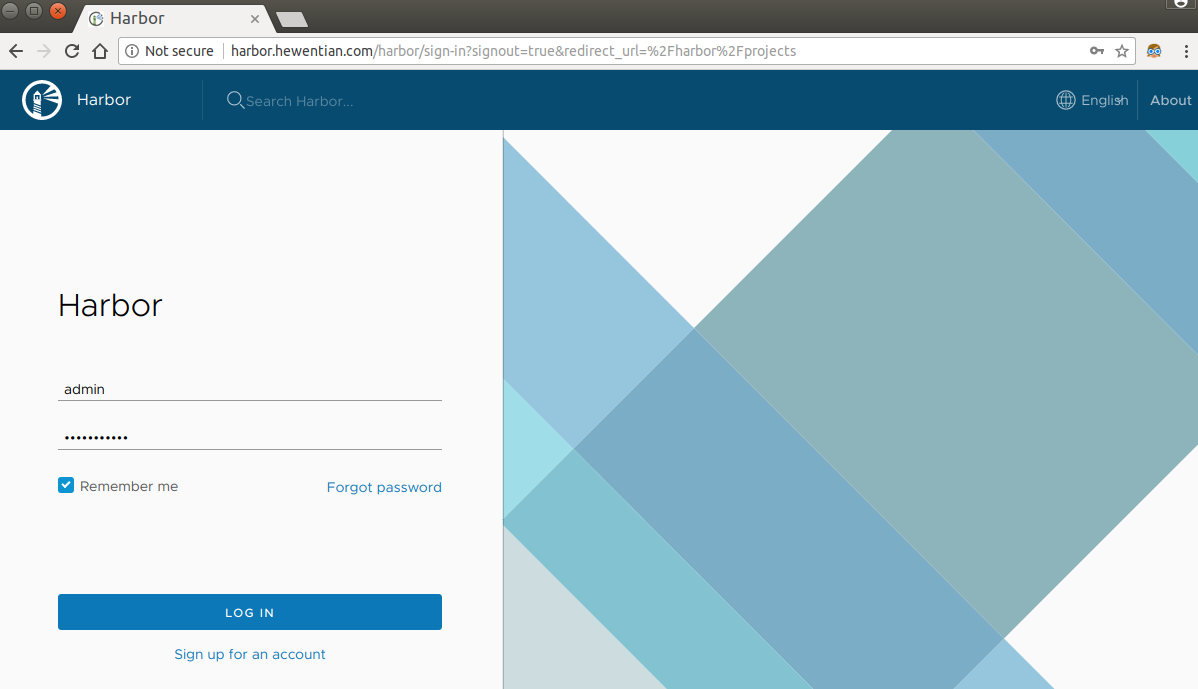
输入管理员的初始用户名/密码:admin/Harbor12345,登录之后,在页面上可以修改密码。登录之后,如下图:
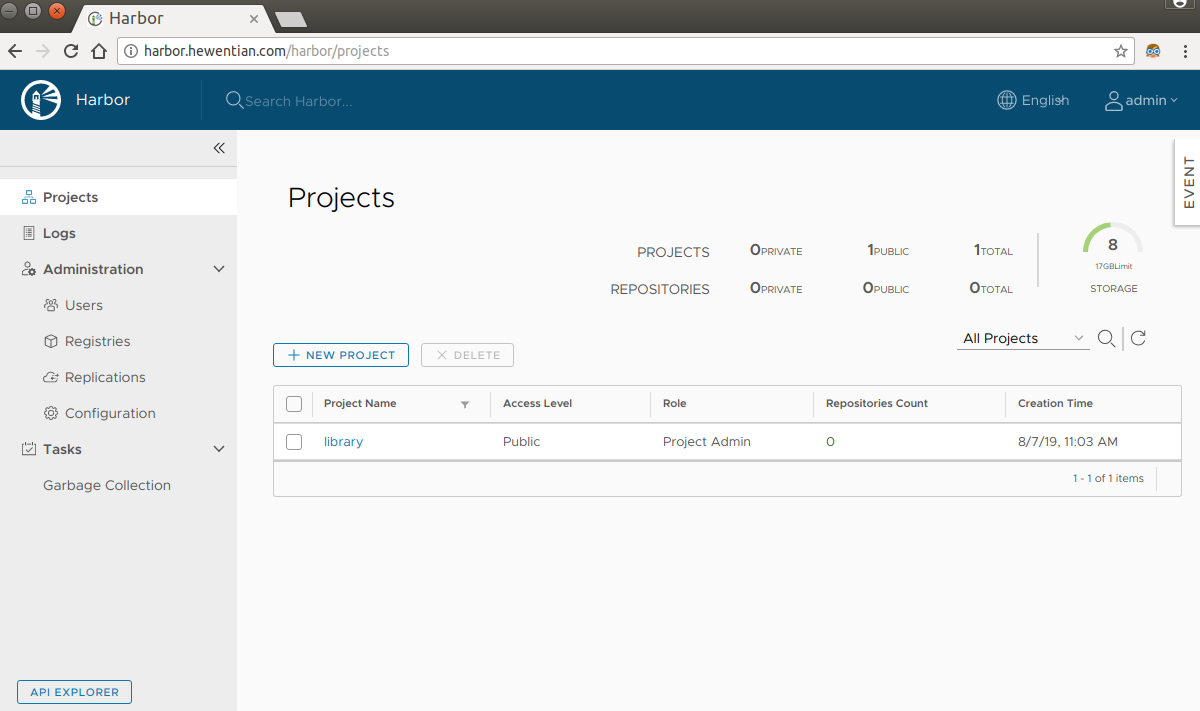
我们创建一个用户,用户名/密码:hewentian/Harbor12345,用于上传下载镜像:

然后我们退出管理员帐号,用新创建的用户登录:
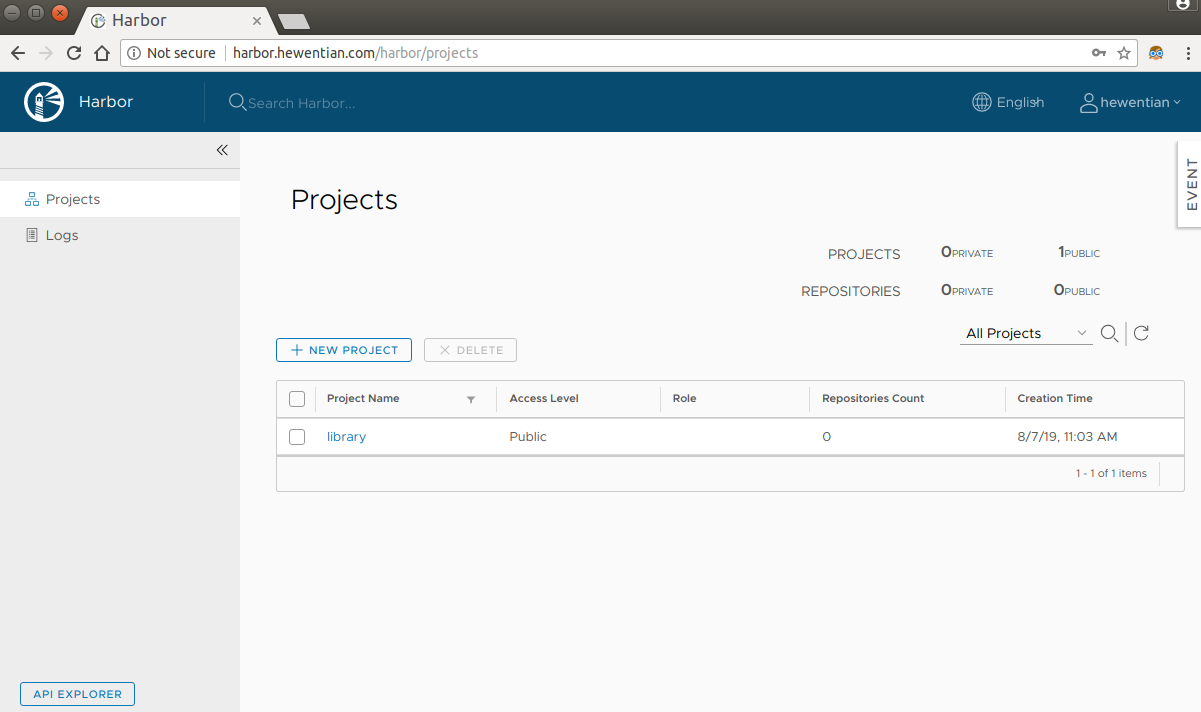
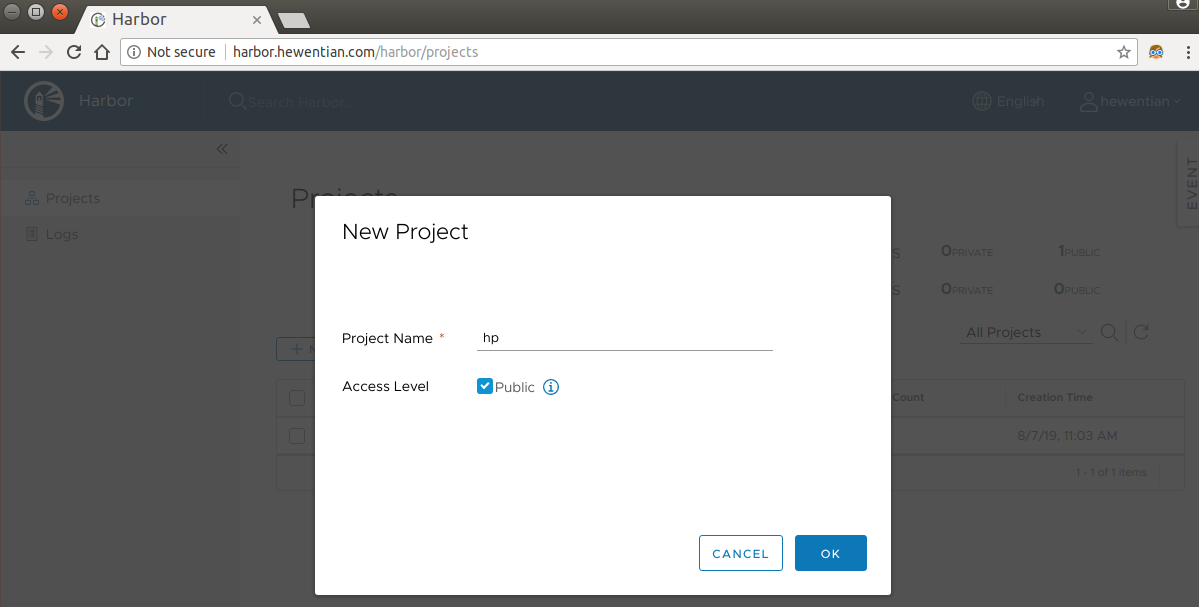
创建一个project,名为hp,可见性为public:
docker登录到harbor1
2
3$ sudo docker login harbor.hewentian.com -u hewentian
Password:
Error response from daemon: Get https://harbor.hewentian.com/v2/: dial tcp 192.168.56.113:443: connect: connection refused
有可能会报上面的错误,原因是docker与registry交互默认使用的是HTTPS,但是我们搭建的harbor默认使用的是HTTP服务。解决方法:
在要登录到harbor的机器(本地机器)作如下配置1
2
3
4
5$ sudo vi /etc/docker/daemon.json
{
"insecure-registries": ["harbor.hewentian.com"]
}
文件/etc/docker/daemon.json原先可能并不存在,它所有可能的配置,可以参考这里:
https://docs.docker.com/engine/reference/commandline/dockerd/#daemon-configuration-file
重启(本地机器)的docker,并重新尝试登录到harbor1
2
3
4
5
6
7
8
9$ sudo service docker restart
$ sudo docker login harbor.hewentian.com -u hewentian
Password:
WARNING! Your password will be stored unencrypted in /home/hewentian/.docker/config.json.
Configure a credential helper to remove this warning. See
https://docs.docker.com/engine/reference/commandline/login/#credentials-store
Login Succeeded
将本地镜像上传到私有镜像仓库harbor
上传到私库的命令,和上传到官方仓库的命令差不多,命令如下:
docker push reg.yourdomain.com/myproject/myrepo:mytag
先查看本地的所有镜像1
2
3
4
5
6
7
8$ sudo docker images
REPOSITORY TAG IMAGE ID CREATED SIZE
hewentian/ubuntu v2.1 3712fd008024 8 days ago 64.2MB
hewentian/ubuntu v2 2bdf86d10fbc 10 days ago 91MB
nginx latest e445ab08b2be 2 weeks ago 126MB
ubuntu 18.04 3556258649b2 2 weeks ago 64.2MB
hello-world latest fce289e99eb9 7 months ago 1.84kB
training/webapp latest 6fae60ef3446 4 years ago 349MB
例如我们要将ubuntu:18.04上传到harbor1
2
3
4$ sudo docker push harbor.hewentian.com/hp/ubuntu:18.04
[sudo] password for hewentian:
The push refers to repository [harbor.hewentian.com/hp/ubuntu]
An image does not exist locally with the tag: harbor.hewentian.com/hp/ubuntu
可以看到,不能直接上传,要先为待上传的镜像打tag1
2
3
4
5
6
7
8
9
10
11$ sudo docker tag ubuntu:18.04 harbor.hewentian.com/hp/ubuntu:18.04
$ sudo docker images
REPOSITORY TAG IMAGE ID CREATED SIZE
hewentian/ubuntu v2.1 3712fd008024 8 days ago 64.2MB
hewentian/ubuntu v2 2bdf86d10fbc 10 days ago 91MB
nginx latest e445ab08b2be 2 weeks ago 126MB
harbor.hewentian.com/hp/ubuntu 18.04 3556258649b2 2 weeks ago 64.2MB
ubuntu 18.04 3556258649b2 2 weeks ago 64.2MB
hello-world latest fce289e99eb9 7 months ago 1.84kB
training/webapp latest 6fae60ef3446 4 years ago 349MB
从上面可以看到,打tag后的镜像只是原镜像的一个引用,它们的IMAGE ID是一样的。1
2
3
4
5
6
7$ sudo docker push harbor.hewentian.com/hp/ubuntu:18.04
The push refers to repository [harbor.hewentian.com/hp/ubuntu]
b079b3fa8d1b: Pushed
a31dbd3063d7: Pushed
c56e09e1bd18: Pushed
543791078bdb: Pushed
18.04: digest: sha256:d91842ef309155b85a9e5c59566719308fab816b40d376809c39cf1cf4de3c6a size: 1152
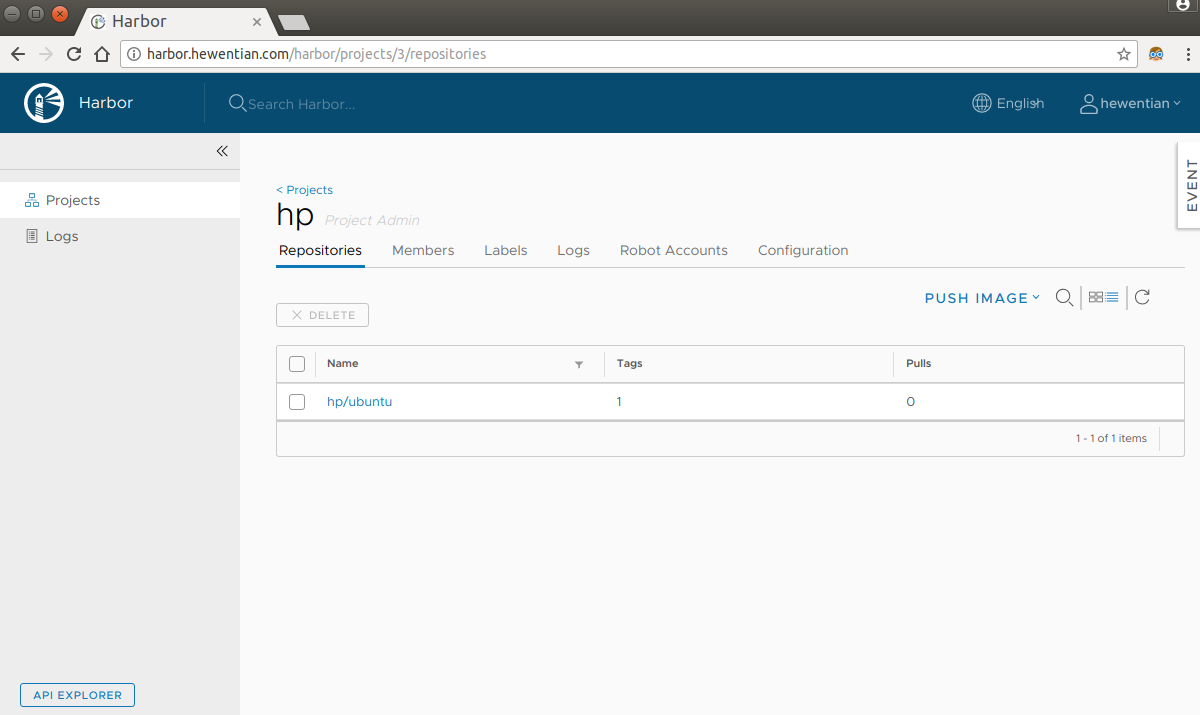
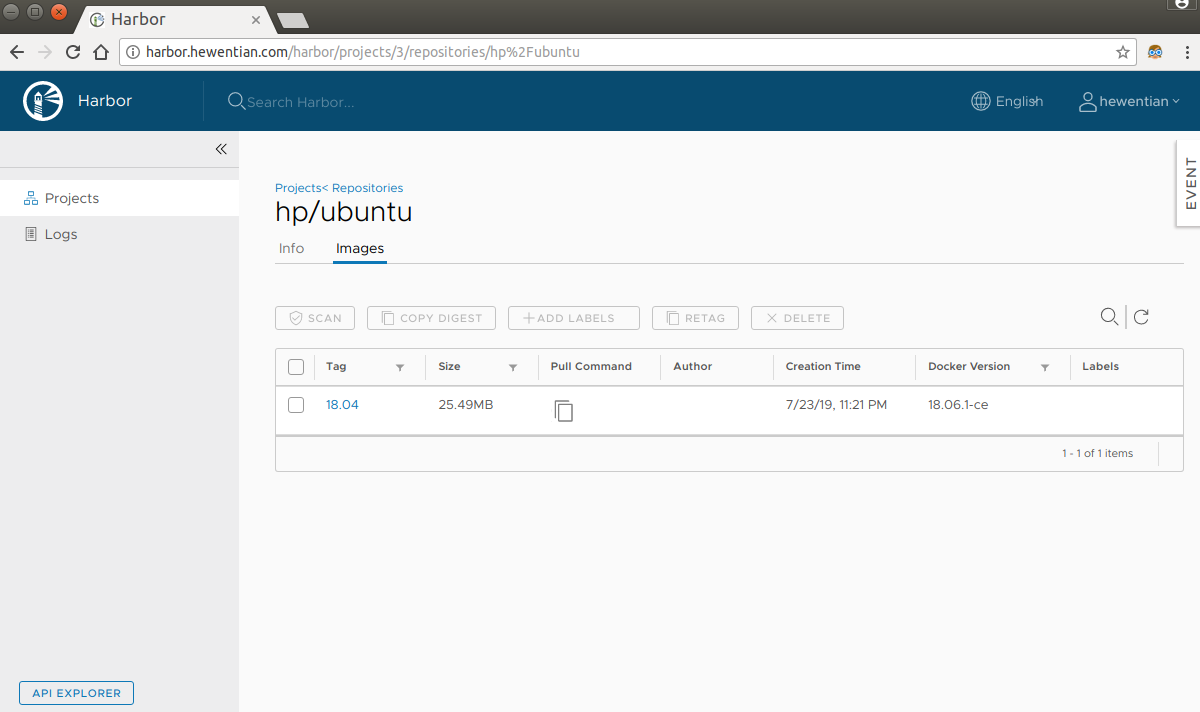
上传成功。同样在浏览器上面,也可以看到,已经成功上传了。
从harbor下载镜像
先将本地的镜像删掉1
2
3
4
5
6
7
8
9
10
11
12
13$ sudo docker rmi harbor.hewentian.com/hp/ubuntu:18.04
Untagged: harbor.hewentian.com/hp/ubuntu:18.04
Untagged: harbor.hewentian.com/hp/ubuntu@sha256:d91842ef309155b85a9e5c59566719308fab816b40d376809c39cf1cf4de3c6a
$ sudo docker rmi ubuntu:18.04
$ sudo docker images
REPOSITORY TAG IMAGE ID CREATED SIZE
hewentian/ubuntu v2.1 3712fd008024 8 days ago 64.2MB
hewentian/ubuntu v2 2bdf86d10fbc 10 days ago 91MB
nginx latest e445ab08b2be 2 weeks ago 126MB
hello-world latest fce289e99eb9 7 months ago 1.84kB
training/webapp latest 6fae60ef3446 4 years ago 349MB
然后从harbor下载1
2
3
4
5
6
7
8
9
10
11
12
13
14
15
16
17
18$ sudo docker pull harbor.hewentian.com/hp/ubuntu:18.04
18.04: Pulling from hp/ubuntu
7413c47ba209: Pull complete
0fe7e7cbb2e8: Pull complete
1d425c982345: Pull complete
344da5c95cec: Pull complete
Digest: sha256:d91842ef309155b85a9e5c59566719308fab816b40d376809c39cf1cf4de3c6a
Status: Downloaded newer image for harbor.hewentian.com/hp/ubuntu:18.04
harbor.hewentian.com/hp/ubuntu:18.04
$ sudo docker images
REPOSITORY TAG IMAGE ID CREATED SIZE
hewentian/ubuntu v2.1 3712fd008024 8 days ago 64.2MB
hewentian/ubuntu v2 2bdf86d10fbc 10 days ago 91MB
nginx latest e445ab08b2be 2 weeks ago 126MB
harbor.hewentian.com/hp/ubuntu 18.04 3556258649b2 2 weeks ago 64.2MB
hello-world latest fce289e99eb9 7 months ago 1.84kB
training/webapp latest 6fae60ef3446 4 years ago 349MB
查看harbor进程状态
harbor的日志默认存放在/var/log/harbor,如果有下列哪个服务不是Up状态,可以查看相关日志1
2
3
4
5
6
7
8
9
10
11
12
13$ sudo docker-compose ps
[sudo] password for hadoop:
Name Command State Ports
---------------------------------------------------------------------------------------------
harbor-core /harbor/start.sh Up (healthy)
harbor-db /entrypoint.sh postgres Up (healthy) 5432/tcp
harbor-jobservice /harbor/start.sh Up
harbor-log /bin/sh -c /usr/local/bin/ ... Up (healthy) 127.0.0.1:1514->10514/tcp
harbor-portal nginx -g daemon off; Up (healthy) 80/tcp
nginx nginx -g daemon off; Up (healthy) 0.0.0.0:80->80/tcp
redis docker-entrypoint.sh redis ... Up 6379/tcp
registry /entrypoint.sh /etc/regist ... Up (healthy) 5000/tcp
registryctl /harbor/start.sh Up (healthy)
harbor生命周期管理
可以使用docker-compose命令来启动、停止harbor
停止harbor:1
2
3
4
5
6
7
8
9
10
11$ sudo docker-compose stop
Stopping nginx ... done
Stopping harbor-jobservice ... done
Stopping harbor-portal ... done
Stopping harbor-core ... done
Stopping registry ... done
Stopping harbor-db ... done
Stopping registryctl ... done
Stopping redis ... done
Stopping harbor-log ... done
启动harbor:1
2
3
4
5
6
7
8
9
10
11$ sudo docker-compose start
Starting log ... done
Starting registry ... done
Starting registryctl ... done
Starting postgresql ... done
Starting core ... done
Starting portal ... done
Starting redis ... done
Starting jobservice ... done
Starting proxy ... done
参考文献:
https://docs.docker.com/
https://blog.docker.com/
https://github.com/goharbor/harbor
将宿主机的文件复制到容器里面
sudo docker cp /data.txt containerID:/
注意:一定要指定复制到的目录位置
未完待续……