今天一看,天哪,原来已经有4个月没有更新博客了,我在想,这4个月我都干嘛去了,内心立马慌起来了(你知道的,程序员是不能停止学习的)。但是细想,虽然没更新博客,但还是看了几本书:《从0到1》、《毛泽东选集》卷一、《MongoDB in Action》、《SpringBoot in Action》、《白帽子讲Web安全》,内心立马淡定了不少。好了,题外话不多说了,马上进入主题。
nginx是一个HTTP和反向代理服务器、邮件代理服务器和通用的TCP/UDP代理服务器,最初由俄罗斯程序员Igor Sysoev所开发。
详细介绍可以参见:
http://nginx.org/en/
http://nginx.org/en/docs/
本文将说下nginx的简单安装使用,因为在项目中要使用到的。我在虚拟机VirtualBox中的机器中安装,系统为Ubuntu Linux,机器节点相关配置如下(之前安装过Hadoop集群的机器):
master:
    ip: 192.168.56.110
    hostname: hadoop-host-master
首先,我们要将nginx的安装包下载回来,截止本文写时,它的最新稳定版本为1.16.0,可以在它的官网下载。我先在我的物理机器下载回来。
1 | $ cd /home/hewentian/Downloads/ |
在物理机上将它传到要安装的机器hadoop-host-master:1
$ scp nginx-1.16.0.tar.gz hadoop@hadoop-host-master:~/
接下来,我们进入hadoop-host-master中操作:1
2
3
4
5
6
7
8
9
10
11
12
13
14
15
16
17
18
19
20
21
22
23
24
25
26
27
28
29
30
31
32
33
34$ ssh hadoop@hadoop-host-master
$ tar xf nginx-1.16.0.tar.gz
$ cd nginx-1.16.0/
$ ls
auto CHANGES CHANGES.ru conf configure contrib html LICENSE man README src
$ sudo ./configure --with-http_stub_status_module --with-http_ssl_module --with-http_realip_module
checking for OS
+ Linux 4.15.0-39-generic x86_64
...
中间省略部分
Configuration summary
+ using system PCRE library
+ OpenSSL library is not used
+ using system zlib library
nginx path prefix: "/usr/local/nginx"
nginx binary file: "/usr/local/nginx/sbin/nginx"
nginx modules path: "/usr/local/nginx/modules"
nginx configuration prefix: "/usr/local/nginx/conf"
nginx configuration file: "/usr/local/nginx/conf/nginx.conf"
nginx pid file: "/usr/local/nginx/logs/nginx.pid"
nginx error log file: "/usr/local/nginx/logs/error.log"
nginx http access log file: "/usr/local/nginx/logs/access.log"
nginx http client request body temporary files: "client_body_temp"
nginx http proxy temporary files: "proxy_temp"
nginx http fastcgi temporary files: "fastcgi_temp"
nginx http uwsgi temporary files: "uwsgi_temp"
nginx http scgi temporary files: "scgi_temp"
在./configure过程中会检查依赖的缺失情况,如果有缺失,则会在这里提示。我们根据提示安装即可。
一般来说,nginx编译会依赖:zlib、zlib-devel、openssl、openssl-devel、pcre、pcre-devel、gcc、g++
在CentOS上可以通过以下方式进行安装:1
$ yum -y install zlib zlib-devel openssl openssl-devel pcre pcre-devel
而在Ubuntu上面则可以通过下面的方式进行安装:1
2
3
4
5$ sudo apt-get install build-essential 这会同时安装 gcc、g++
$ sudo apt-get install zlib1g
$ sudo apt-get install openssl libssl-dev
$ sudo apt-get install libpcre3 libpcre3-dev
$ sudo apt-get install zlib1g-dev
接下来进行编译安装:1
2
3
4
5
6
7
8
9
10
11$ sudo make && make install
objs/ngx_modules.o \
-ldl -lpthread -lcrypt -lpcre -lz \
-Wl,-E
sed -e "s|%%PREFIX%%|/usr/local/nginx|" \
-e "s|%%PID_PATH%%|/usr/local/nginx/logs/nginx.pid|" \
-e "s|%%CONF_PATH%%|/usr/local/nginx/conf/nginx.conf|" \
-e "s|%%ERROR_LOG_PATH%%|/usr/local/nginx/logs/error.log|" \
< man/nginx.8 > objs/nginx.8
make[1]: Leaving directory '/home/hadoop/nginx-1.16.0'
它默认会安装到/usr/local/nginx/目录下。
启动命令如下:1
$ sudo /usr/local/nginx/sbin/nginx -c /usr/local/nginx/conf/nginx.conf
注意:使用-c参数指定配置文件一定要使用绝对路径,否则可能会报错。
修改配置文件后,检查配置文件是否正确的命令如下:1
2
3
4$ sudo /usr/local/nginx/sbin/nginx -t -c /usr/local/nginx/conf/nginx.conf
nginx: the configuration file /usr/local/nginx/conf/nginx.conf syntax is ok
nginx: configuration file /usr/local/nginx/conf/nginx.conf test is successful
可以打开 http://192.168.56.110/ 来看看是否已启动。

另外,使用 http://hadoop-host-master/ 也是一样的。

当你看到上面的界面后,nginx的安装到这里就成功了。
一些常用操作命令
进入nginx的安装目录,这里进入默认安装目录,然后查看帮助信息:1
2
3
4
5
6
7
8
9
10
11
12
13
14
15
16
17$ cd /usr/local/nginx/sbin
$ ./nginx -h
nginx version: nginx/1.16.0
Usage: nginx [-?hvVtTq] [-s signal] [-c filename] [-p prefix] [-g directives]
Options:
-?,-h : this help
-v : show version and exit
-V : show version and configure options then exit
-t : test configuration and exit
-T : test configuration, dump it and exit
-q : suppress non-error messages during configuration testing
-s signal : send signal to a master process: stop, quit, reopen, reload
-p prefix : set prefix path (default: /usr/local/nginx/)
-c filename : set configuration file (default: conf/nginx.conf)
-g directives : set global directives out of configuration file
说明如下:
- 启动命令:
./nginx; - 关闭命令:
./nginx -s stop,快速停止nginx,可能并不保存相关信息; - 退出命令:
./nginx -s quit,完整有序的停止nginx,会保存相关信息,建议使用此命令; - 动态加载配置文件:
./nginx -s reload可以不关闭nginx的情况下更新配置文件; - 重新打开日志文件:
./nginx -s reopen; - 查看Nginx版本:
./nginx -v; - 检查配置文件是否正确:
./nginx -t或者检查指定配置文件./nginx -t -c /usr/local/nginx/conf/nginx.conf。
接下来,我们作一些简单的配置示例。但是在开始之前,在执行访问的机器上面(在这里是我的物理机器),配置一下HOST,增加下面这3行:1
2
3
4
5
6
7$ sudo vi /etc/hosts
192.168.56.110 www.hewentian.com
192.168.56.110 admin.hewentian.com
192.168.56.110 img.hewentian.com
192.168.56.110 api.hewentian.com
192.168.56.110 so.hewentian.com
示例一:将某目录下的图片,让其他机器可以通过WEB访问
在安装了nginx的机器hadoop-host-master上有个目录/home/hadoop/Pictures,这个目录下放有图片(我的机器里有一张:my_computer.png)。现在想通过web,让其他机器的用户访问这个目录下的图片。
修改nginx.conf配置,添加如下代码即可:1
2
3
4
5
6
7
8
9
10
11
12
13
14
15
16
17$ sudo vi /usr/local/nginx/conf/nginx.conf
server {
listen 80;
server_name img.hewentian.com; # 修改 1/3: WEB访问的位置
access_log logs/img.access.log main; # 修改 2/3: 日志存放位置。记得将此配置文件中的 log_format main 前面的注释打开
location / {
root /home/hadoop/Pictures/; # 修改 3/3: 图片存放位置
index index.html index.htm;
}
error_page 500 502 503 504 /50x.html;
location = /50x.html {
root html;
}
}
保存文件后,退出。
检查配置文件是否正确:1
$ sudo /usr/local/nginx/sbin/nginx -t -c /usr/local/nginx/conf/nginx.conf
然后重启nginx,首先找出nginx进程号:
ps -ef | grep nginx
然后杀死nginx的主进程:
sudo kill -9 [nginx进程号]
重启nginx
sudo /usr/local/nginx/sbin/nginx -c /usr/local/nginx/conf/nginx.conf
在物理机器上面打开浏览器,试着访问: http://img.hewentian.com/my_computer.png

查看nginx访问日志:1
2
3
4
5
6
7
8
9
10$ tail /usr/local/nginx/logs/img.access.log
192.168.56.1 - - [11/Jun/2019:22:46:33 +0800] "GET / HTTP/1.1" 403 555 "-" "Mozilla/5.0 (X11; Linux x86_64) AppleWebKit/537.36 (KHTML, like Gecko) Chrome/62.0.3202.75 Safari/537.36" "-"
192.168.56.1 - - [11/Jun/2019:22:46:50 +0800] "GET /my_computer.png HTTP/1.1" 200 59332 "-" "Mozilla/5.0 (X11; Linux x86_64) AppleWebKit/537.36 (KHTML, like Gecko) Chrome/62.0.3202.75 Safari/537.36" "-"
192.168.56.1 - - [11/Jun/2019:22:47:21 +0800] "GET /my_computer.png HTTP/1.1" 304 0 "-" "Mozilla/5.0 (X11; Linux x86_64) AppleWebKit/537.36 (KHTML, like Gecko) Chrome/62.0.3202.75 Safari/537.36" "-"
192.168.56.1 - - [12/Jun/2019:00:51:04 +0800] "GET /my_computer.png HTTP/1.1" 304 0 "-" "Mozilla/5.0 (X11; Linux x86_64) AppleWebKit/537.36 (KHTML, like Gecko) Chrome/62.0.3202.75 Safari/537.36" "-"
192.168.56.1 - - [12/Jun/2019:00:51:04 +0800] "GET /my_computer.png HTTP/1.1" 304 0 "-" "Mozilla/5.0 (X11; Linux x86_64) AppleWebKit/537.36 (KHTML, like Gecko) Chrome/62.0.3202.75 Safari/537.36" "-"
192.168.56.1 - - [12/Jun/2019:00:51:04 +0800] "GET /my_computer.png HTTP/1.1" 304 0 "-" "Mozilla/5.0 (X11; Linux x86_64) AppleWebKit/537.36 (KHTML, like Gecko) Chrome/62.0.3202.75 Safari/537.36" "-"
192.168.56.1 - - [12/Jun/2019:00:51:05 +0800] "GET /my_computer.png HTTP/1.1" 304 0 "-" "Mozilla/5.0 (X11; Linux x86_64) AppleWebKit/537.36 (KHTML, like Gecko) Chrome/62.0.3202.75 Safari/537.36" "-"
192.168.56.1 - - [12/Jun/2019:01:02:06 +0800] "GET /my_computer.png HTTP/1.1" 304 0 "-" "Mozilla/5.0 (X11; Linux x86_64) AppleWebKit/537.36 (KHTML, like Gecko) Chrome/62.0.3202.75 Safari/537.36" "-"
示例二:实现简单的负载匀衡
有个应用,它有个接口/hello,是返回当前服务器的IP地址。我是使用SpringBoot来简单开发的,代码只有几行:
1 | package com.hewentian.web.controller; |
部署在下面的2台服务器上,都是监听8080端口。
slave1:
    ip: 192.168.56.111
    hostname: hadoop-host-slave-1
slave2:
    ip: 192.168.56.112
    hostname: hadoop-host-slave-2
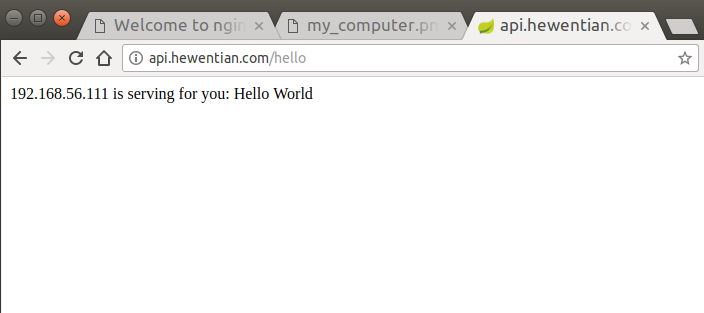
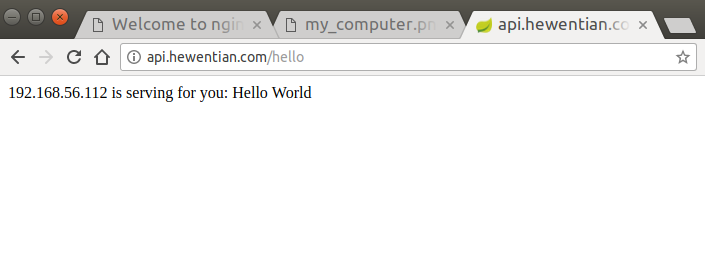
现在想在网页上访问:http://192.168.56.110 或 http://api.hewentian.com 的时候,就会访问到上面这2台机器,实现负载均衡。
修改nginx.conf配置,添加如下代码即可:1
2
3
4
5
6
7
8
9
10
11
12
13
14
15
16
17
18
19
20
21
22
23$ sudo vi /usr/local/nginx/conf/nginx.conf
upstream api_worker {
server 192.168.56.111:8080 weight=3000;
server 192.168.56.112:8080 weight=3000;
keepalive 2000;
}
server {
listen 80;
server_name 192.168.56.110 api.hewentian.com;
access_log logs/api.access.log main;
location / {
proxy_pass http://api_worker/;
proxy_redirect off;
proxy_set_header Host $host;
proxy_set_header X-Real-IP $remote_addr;
proxy_set_header X-Forwarded-For $proxy_add_x_forwarded_for;
proxy_http_version 1.1;
proxy_set_header Connection "";
}
}
重启nginx。正常情况下,流量会匀衡地分到2台服务器,如下图所示。

如果两台机器中的某一台挂掉了,流量会自动分到另外一台,这样也实现了简单的高可用。
查看nginx访问日志:1
2
3
4
5
6
7
8
9
10
11
12$ tail /usr/local/nginx/logs/api.access.log
192.168.56.1 - - [12/Jun/2019:02:46:52 +0800] "GET /hello HTTP/1.1" 200 46 "-" "Mozilla/5.0 (X11; Linux x86_64) AppleWebKit/537.36 (KHTML, like Gecko) Chrome/62.0.3202.75 Safari/537.36" "-"
192.168.56.1 - - [12/Jun/2019:02:46:52 +0800] "GET /favicon.ico HTTP/1.1" 200 946 "http://api.hewentian.com/hello" "Mozilla/5.0 (X11; Linux x86_64) AppleWebKit/537.36 (KHTML, like Gecko) Chrome/62.0.3202.75 Safari/537.36" "-"
示例三:实现同一个域名下的两个服务
有两个服务:
一个是一个WEB服务,是指向另一台机器的,其中/hello是一个接口:
http://www.hewentian.com/api/hello
另一个是用来看某个目录下的图片的:
http://www.hewentian.com/img/my_computer.png
修改nginx.conf配置,添加如下代码即可:1
2
3
4
5
6
7
8
9
10
11
12
13
14
15
16
17
18
19
20
21
22
23
24
25
26
27
28
29
30
31
32$ sudo vi /usr/local/nginx/conf/nginx.conf
upstream api_worker {
server 192.168.56.111:8080 weight=3000;
keepalive 2000;
}
server {
listen 80;
server_name www.hewentian.com;
location / {
root html;
index index.html;
}
location /api/ {
proxy_pass http://api_worker/;
#proxy_redirect off;
proxy_set_header Host $host;
proxy_set_header X-Real-IP $remote_addr;
proxy_set_header X-Forwarded-For $proxy_add_x_forwarded_for;
#proxy_http_version 1.1;
#proxy_set_header Connection "";
access_log logs/api.access.log main;
}
location /img/ {
alias /home/hadoop/Pictures/;
access_log logs/img.access.log main;
}
}
重启nginx。访问上述地址,将得到如下图效果:


查看nginx访问日志:1
2
3
4
5
6
7$ tail -n1 /usr/local/nginx/logs/api.access.log /usr/local/nginx/logs/img.access.log
==> /usr/local/nginx/logs/api.access.log <==
192.168.56.1 - - [12/Jun/2019:04:09:55 +0800] "GET /api/hello HTTP/1.1" 200 46 "-" "Mozilla/5.0 (X11; Linux x86_64) AppleWebKit/537.36 (KHTML, like Gecko) Chrome/62.0.3202.75 Safari/537.36" "-"
==> /usr/local/nginx/logs/img.access.log <==
192.168.56.1 - - [12/Jun/2019:04:08:04 +0800] "GET /img/my_computer.png HTTP/1.1" 200 59332 "-" "Mozilla/5.0 (X11; Linux x86_64) AppleWebKit/537.36 (KHTML, like Gecko) Chrome/62.0.3202.75 Safari/537.36" "-"
示例四:静态HTML项目、WEB接口项目并存和Tomcat项目
有三个服务:
第一个是一个WEB服务,是指向另一台机器的,其中
/hello是一个接口,另外此WEB项目包含静态HTML代码:
http://www.hewentian.com/index.html 最后的 /index.html不能少
http://www.hewentian.com/hello第二个也是一个WEB服务,是指向另一台机器的,其中
/hello是一个接口,另外此WEB项目包含静态HTML代码:
http://admin.hewentian.com/index.html 最后的 /index.html不能少
http://admin.hewentian.com/hello第三个是Tomcat中的一个WEB项目:
http://so.hewentian.com
修改nginx.conf配置,添加如下代码即可:1
2
3
4
5
6
7
8
9
10
11
12
13
14
15
16
17
18
19
20
21
22
23
24
25
26
27
28
29
30
31
32
33
34
35
36
37
38
39
40
41
42
43
44
45
46
47
48
49
50
51
52
53$ sudo vi /usr/local/nginx/conf/nginx.conf
server {
listen 80;
server_name www.hewentian.com;
access_log logs/www.access.log main;
location ~* (.html|.js|.css|.png|.jpg|.gif|.ico|.woff|.ttf|.woff2)$ {
root /home/hadoop/www-hewentian;
index main.html index.html index.htm;
}
location / {
proxy_pass http://192.168.56.111:8080;
proxy_redirect off;
proxy_set_header Host $host;
proxy_set_header X-Real-IP $remote_addr;
proxy_set_header X-Forwarded-For $proxy_add_x_forwarded_for;
}
}
server {
listen 80;
server_name admin.hewentian.com;
access_log logs/admin.access.log main;
location ~* (.html|.js|.css|.png|.jpg|.gif|.ico|.woff|.ttf|.woff2)$ {
root /home/hadoop/admin-hewentian;
index main.html index.html index.htm;
}
location / {
proxy_pass http://192.168.56.112:8080;
proxy_redirect off;
proxy_set_header Host $host;
proxy_set_header X-Real-IP $remote_addr;
proxy_set_header X-Forwarded-For $proxy_add_x_forwarded_for;
}
}
server {
listen 80;
server_name so.hewentian.com;
access_log logs/so.access.log main;
location / {
proxy_pass http://192.168.56.111:8082/so/; # 注意:最后的/不能少,具体位置: /home/hadoop/apache-tomcat-8.0.47/webapps/so
proxy_redirect off;
proxy_set_header Host $host;
proxy_set_header X-Real-IP $remote_addr;
proxy_set_header X-Forwarded-For $proxy_add_x_forwarded_for;
}
}
示例五:同一个Tomcat下的两个项目
有三个服务:
第一个是一个WEB服务:
http://www.hewentian.com/so/第二个也是一个WEB服务,和第一个项目在同一个Tomcat中:
http://www.hewentian.com/smswzl/第三个是统计nginx状态的功能,需要安装
./configure --with-http_stub_status_module模块,并重新编译安装nginx:
http://www.hewentian.com/nginxstatus
修改nginx.conf配置,添加如下代码即可:1
2
3
4
5
6
7
8
9
10
11
12
13
14
15
16
17
18
19
20
21
22
23
24
25
26
27
28
29
30
31
32
33
34
35
36
37
38
39
40
41
42
43
44
45
46
47
48$ sudo vi /usr/local/nginx/conf/nginx.conf
gzip on;
gzip_min_length 1k;
gzip_buffers 4 16k;
gzip_http_version 1.0;
gzip_comp_level 2;
gzip_types text/plain application/x-javascript text/css application/xml;
gzip_vary on;
upstream tomcatServer {
server 192.168.56.111:8082;
}
server {
listen 80;
server_name www.hewentian.com;
charset utf-8;
root /home/hadoop/www-hewentian;
index main.html index.html index.htm;
access_log logs/www.access.log combined;
#expires
location ~ .*\.(gif|jpg|jpeg|png|bmp|swf)$ {
expires 30d;
}
location ~ .*\.(js|css)?$ {
expires 24h;
}
location /nginxstatus {
stub_status on;
access_log off;
}
location /so {
index index.html;
proxy_pass http://tomcatServer/so;
}
location /smswzl {
index index.html;
proxy_pass http://tomcatServer/smswzl;
}
}
示例六:服务器使用nginx做代理,通过HttpServletRequest获取请求用户的真实IP地址
在使用nginx做代理时,服务端如果直接从`X-Forwarded-For`头部获取来源IP,将获取到nginx所在的ip
地址,而不是请求的真实ip地址。那么,如何获取请求的真实IP地址?
首先,在nginx执行`./configure`的时候一定要加上`--with-http_realip_module`模块,然后在nginx
的配置中添加如下配置。1
2
3
4
5
6location /api/userinfo {
proxy_pass http://127.0.0.1:8081/api/userinfo;
proxy_set_header Host $host;
proxy_set_header X-Real-IP $remote_addr;
proxy_set_header X-Forwarded-For $proxy_add_x_forwarded_for;
}
在nginx中将请求来源IP添加到代理请求头部,然后使用命令重新加载配置
nginx -s reload
服务端使用以下代码即可获取请求主机真实IP地址1
2
3
4
5
6
7
8
9
10
11
12
13
14
15
16
17
18
19
20private String getRealIP(HttpServletRequest request) {
for (String head : Arrays.asList("X-Forwarded-For", "X-Real-IP")) {
String ip = request.getHeader(head);
if (StringUtils.isBlank(ip)) {
continue;
}
log.info("{} : {}", head, ip);
int index = ip.indexOf(',');
if (index != -1) {
ip = ip.substring(0, index);
}
return ip.trim(); // 一般从 X-Forwarded-For 中即可获取并返回
}
return null;
}